21 DIY Painting Ideas to Brighten Your Walls
Looking to add personality and charm to your walls? These 21 DIY painting ideas bring creativity, color, and style into any room. From dreamy watercolor washes to bold geometric patterns, whimsical clouds, and oversized florals, each idea is easy to follow, beginner-friendly, and budget-conscious. Whether you want a playful accent wall, a calming backdrop, or a modern statement piece, these projects let you express your artistic flair while transforming plain walls into eye-catching, Pinterest-ready décor. Grab your paints and brushes—your walls are waiting!
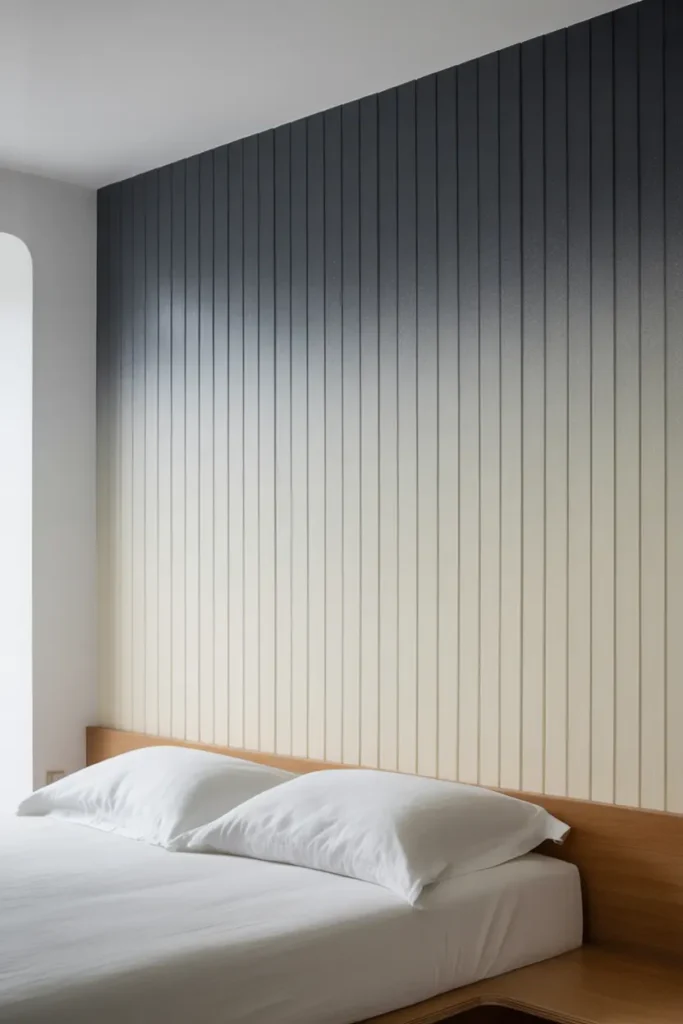
1. Ombre Gradient Wall
Materials Needed:
- Two to three complementary wall paints
- Paint rollers and brushes
- Painter’s tape
- Mixing trays
Steps:
- Paint the base color on the wall
- Apply secondary color at the top or bottom
- Blend the transition gradually with a roller or brush
- Smooth edges for a seamless gradient
- Let dry completely
Ombre gradient walls are a stunning DIY painting idea that instantly brightens any bedroom. The gradual transition from dark to light creates visual depth and a calming vibe, making the space feel taller and more spacious. It works with bold contrasts or soft pastels, depending on your décor style. This beginner-friendly project doesn’t require precision, as slight blending imperfections enhance the handmade effect. Ideal behind beds or in reading nooks, the gradient wall becomes a stylish focal point that reflects creativity and adds a modern, professional look without needing professional skills.
The beauty of an ombre wall is its versatility—you can layer multiple colors, experiment with vertical gradients, or even create a diagonal ombre for a dynamic effect. Pairing this wall with simple furniture and neutral décor lets the colors shine as the main attraction. It’s an affordable DIY painting idea that requires minimal materials but delivers maximum impact. Perfect for bedrooms, offices, or creative spaces, this gradient technique transforms plain walls into eye-catching features, giving your room a fresh, airy, and Pinterest-ready style that’s both relaxing and elegant.
2. Geometric Triangle Accent Wall

Materials Needed:
- Three complementary wall paint colors
- Painter’s tape
- Ruler and pencil
- Small brushes or roller
Steps:
- Lightly sketch triangles on the wall
- Tape edges carefully for crisp lines
- Paint each triangle with the chosen color
- Remove tape once paint dries
- Touch up edges for a clean finish
Geometric triangle walls are a modern DIY painting idea perfect for brightening bedrooms or living areas. The structured shapes provide visual interest while remaining clean and contemporary. Using painter’s tape ensures sharp lines, even for beginners, and allows you to mix contrasting or harmonious colors. This technique adds depth and movement to a space without overcrowding it. Large triangles make a bold statement, while smaller, repeated patterns provide a subtle, sophisticated look. It’s an accessible project that transforms blank walls into dynamic, stylish features with minimal effort and maximum visual impact.
The versatility of geometric patterns allows you to personalize your wall design completely. You can choose bold, vibrant colors for energy or soft pastels for a calming effect. Placing this accent wall behind a bed or study desk instantly makes the space Pinterest-worthy. It’s a creative and budget-friendly DIY painting idea that requires basic tools and paint, but the outcome looks professionally designed. The geometric wall not only adds color but also provides structure, making it a striking yet functional focal point in any room.
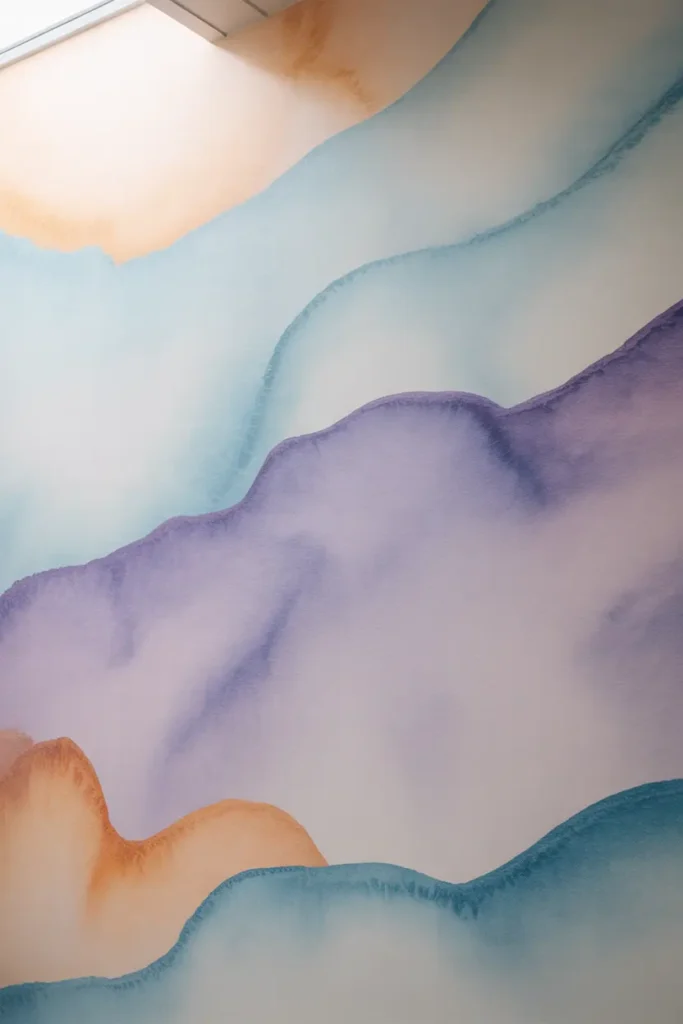
3. Watercolor Wash Wall
Materials Needed:
- Wall paint in pastel shades
- Large brushes or sponges
- Spray bottle with water
- Mixing trays
Steps:
- Lightly dampen the wall with water
- Apply diluted paint in flowing patches
- Blend edges using a sponge
- Layer multiple colors gradually
- Allow to dry completely
Watercolor wash walls are an elegant DIY painting idea for adding a soft, artistic touch to any room. The free-flowing pastel layers mimic traditional watercolor art, creating a calming, airy atmosphere that enhances bedrooms or creative spaces. This beginner-friendly technique is forgiving—slight irregularities in blending look intentional and add charm. By layering colors gradually, you can create a delicate gradient effect or a vibrant, dreamy backdrop. This method adds depth, personality, and style, turning ordinary walls into artistic focal points that make your space feel sophisticated, serene, and visually captivating.
What makes this DIY painting idea appealing is its flexibility—you can experiment with subtle or bold hues, use complementary colors, or even add metallic accents for a modern touch. The technique also helps conceal minor wall imperfections, giving your walls a professional finish. Perfect behind beds, desks, or reading nooks, this approach turns ordinary walls into gallery-style features. With minimal tools and creative freedom, the watercolor wash wall delivers a high-impact result, making your bedroom bright, dreamy, and Pinterest-ready while encouraging personal expression and artistic experimentation.
4. Half-and-Half Color Block Wall

Materials Needed:
- Two contrasting wall paint colors
- Painter’s tape
- Roller and brushes
- Level or measuring tape
Steps:
- Measure and mark the dividing line
- Apply painter’s tape along the line
- Paint the bottom section with bold color
- Paint the top section with the neutral shade
- Remove tape and touch up edges
The half-and-half color block wall is a trendy DIY painting idea that instantly modernizes any bedroom. The clean horizontal line creates visual structure while offering a bold color contrast that brightens the space. It’s simple to execute using painter’s tape, making it perfect for beginners. The style works beautifully with vibrant and pastel color combinations, giving you freedom to match your room’s theme. This accent wall serves as a striking focal point, adding dimension and personality without cluttering the décor. The effect is elegant, contemporary, and visually impactful.
Color block walls are highly customizable—you can use bold contrasts for drama, soft tones for a subtle effect, or even experiment with diagonal or vertical splits for uniqueness. Pairing this wall with minimalist furniture highlights the striking visual, while adding small décor items keeps the look cohesive. This budget-friendly DIY painting idea transforms ordinary walls into Pinterest-worthy masterpieces, allowing your creativity to shine. With minimal effort and the right tools, you can achieve professional-looking results that refresh your space, add style, and create a bright, energetic atmosphere.
5. Stenciled Pattern Wall

Materials Needed:
- Wall stencil of choice
- Painter’s tape
- Stencil brush or foam roller
- Acrylic or wall paint
Steps:
- Secure stencil on the wall with painter’s tape
- Lightly load brush with paint
- Dab through stencil carefully
- Move stencil and repeat across the wall
- Touch up edges for clean finish
Stenciled walls are a creative DIY painting idea that adds sophistication and charm to bedrooms. Repeating patterns like florals, geometric shapes, or abstract motifs bring rhythm and visual interest without overwhelming the space. Using painter’s tape and a stencil brush ensures crisp, professional-looking results, even for beginners. This method allows for bold color contrasts or soft tone-on-tone designs, creating personalized walls that brighten the room and serve as stylish focal points. It’s perfect for feature walls behind beds or desks and instantly elevates the décor with minimal materials and effort.
One of the advantages of stenciling is flexibility—you can experiment with multiple colors, metallic accents, or combine different stencil patterns for a unique look. The technique also works on small accent areas, such as behind nightstands or reading nooks, making rooms visually dynamic. This beginner-friendly DIY painting idea transforms plain walls into Pinterest-ready art, adding charm, texture, and personality. It’s an affordable, elegant way to brighten spaces while allowing for creative expression, providing a professional-looking finish that enhances your bedroom’s overall aesthetic.
6. Chevron Striped Wall
Materials Needed:
- Two contrasting wall paints
- Painter’s tape
- Roller and brushes
- Level and pencil
Steps:
- Measure and mark chevron lines on the wall
- Tape along the lines to create zigzag edges
- Paint each stripe carefully
- Remove tape while paint is slightly wet
- Touch up edges as needed
Chevron stripes are a bold and trendy DIY painting idea that instantly energizes a bedroom or living space. The repeating zigzag pattern creates movement and visual interest while maintaining a modern look. This technique works with soft pastels for subtle elegance or vibrant colors for dramatic impact. Even beginners can achieve professional results using painter’s tape and careful measurements. Chevron walls pair beautifully with minimalist décor and neutral furniture, ensuring the pattern remains the focal point. It’s a stylish way to refresh a plain wall, adding depth, personality, and Pinterest-worthy charm without a major renovation.
The flexibility of chevron patterns allows you to experiment with color combinations and stripe widths. You can create a subtle accent on one wall or extend the pattern across multiple walls for a striking effect. This DIY painting idea is perfect for bedrooms, entryways, or creative studios, giving a fresh, contemporary aesthetic. The project also doubles as a learning experience for mastering wall measurement and tape application. Chevron stripes are visually captivating, budget-friendly, and a great way to showcase your creative flair while brightening and modernizing any space.
7. Ombre Triangle Wall

Materials Needed:
- Three complementary wall paints
- Painter’s tape
- Ruler and pencil
- Brushes or rollers
Steps:
- Sketch triangles on the wall with pencil
- Tape edges for clean lines
- Paint triangles starting from the darkest color
- Gradually transition to lighter colors toward the top
- Remove tape and touch up edges
Ombre triangle walls are a creative DIY painting idea that blends structure with fluid color transitions. The gradual shift in hues creates depth and dimension, while the geometric shapes keep the design modern and stylish. It’s ideal for bedrooms, creating a bold focal point without overwhelming the space. Beginners can experiment with triangle sizes, placement, and color combinations, ensuring a personalized result. This technique combines two popular trends—ombre and geometric shapes—into a single visually striking wall, offering an elegant and approachable way to refresh any interior with creativity and style.
The ombre triangle effect works beautifully with both vibrant and muted tones, allowing you to tailor the design to your room’s aesthetic. It’s also forgiving for beginners, as slight imperfections in blending enhance the handmade charm. Pairing the wall with simple furniture or neutral décor ensures the pattern remains the centerpiece. This DIY painting idea is a budget-friendly, Pinterest-worthy way to create a modern, visually appealing accent wall that brightens any bedroom or workspace while showcasing your artistic skills and personal style.
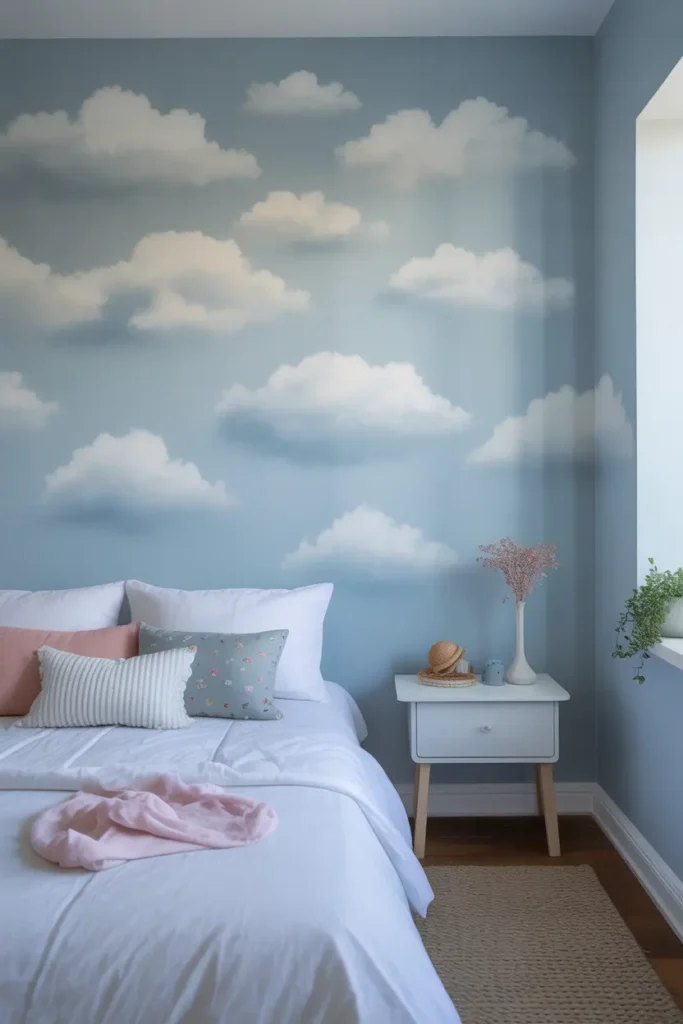
8. Floating Cloud Wall

Materials Needed:
- White and light blue wall paint
- Brushes or sponges
- Pencil for sketching clouds
- Painter’s tape (optional)
Steps:
- Paint the wall light blue as the base
- Lightly sketch cloud shapes in pencil
- Fill clouds with white paint using brush or sponge
- Blend edges softly for a fluffy look
- Let dry completely
A floating cloud wall is a whimsical DIY painting idea perfect for brightening bedrooms and creating a dreamy atmosphere. The soft shapes and gentle transitions evoke calm and imagination, making it ideal for nurseries, kids’ rooms, or creative spaces. The design is beginner-friendly, as irregular cloud shapes enhance the handmade charm. By layering white paint and blending edges softly, you create depth and a realistic sky effect. This approach not only adds color and texture to plain walls but also transforms the room into a serene, airy retreat that feels playful, light, and visually appealing.
This DIY painting idea allows endless creativity—you can mix soft pastel tones for a sunset-inspired sky, or add metallic accents for a magical, modern twist. The floating cloud pattern works beautifully on one accent wall or across multiple walls for a whimsical effect. It’s budget-friendly, simple, and provides a high-impact visual without heavy effort. Perfect for Pinterest-inspired bedrooms, the cloud wall combines creativity, charm, and serenity, offering a relaxing backdrop that brightens the space and makes it feel airy, fun, and inviting.
9. Botanical Silhouette Wall
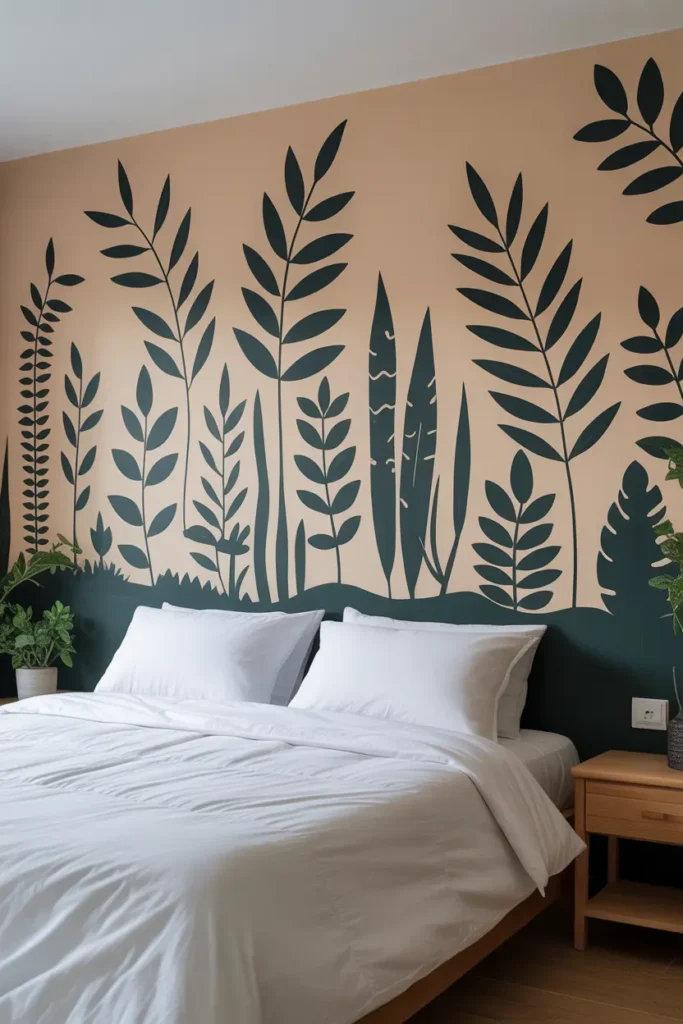
Materials Needed:
- Two contrasting wall paints (background and silhouette)
- Brushes for details
- Pencil for sketching
- Painter’s tape for clean edges (optional)
Steps:
- Paint the wall in the background color
- Sketch leaf and plant silhouettes
- Fill in sketches with dark paint
- Use small brushes for fine details
- Touch up edges for crisp lines
Botanical silhouette walls are a sophisticated DIY painting idea that combines minimalism with natural inspiration. The striking contrast between dark silhouettes and a soft background creates a modern, elegant focal point in bedrooms or living areas. This technique allows for creativity—you can design simple leaves, palm fronds, or intricate floral patterns depending on your skill level. Beginners can start with larger shapes, gradually adding smaller details. This nature-inspired wall brightens the space while maintaining a calm, stylish vibe. It’s perfect for anyone who wants a contemporary, artistic wall without overwhelming the room with color.
The beauty of botanical silhouettes lies in their versatility—you can create a single accent wall or extend the design across multiple walls for a garden-like effect. Pairing with neutral furniture and minimal décor ensures the patterns remain the highlight. This DIY painting idea is beginner-friendly and budget-conscious, requiring only basic paints and brushes. It transforms ordinary walls into Pinterest-worthy features, bringing nature indoors, enhancing the room’s brightness, and adding a calming, modern aesthetic that complements any interior style.
10. Abstract Brush Stroke Wall
Materials Needed:
- Several wall paint colors
- Wide and medium brushes
- Painter’s tape (optional)
- Mixing trays
Steps:
- Choose a color palette
- Apply random brush strokes across the wall
- Layer colors for depth and contrast
- Blend edges or leave rough for texture
- Let dry completely
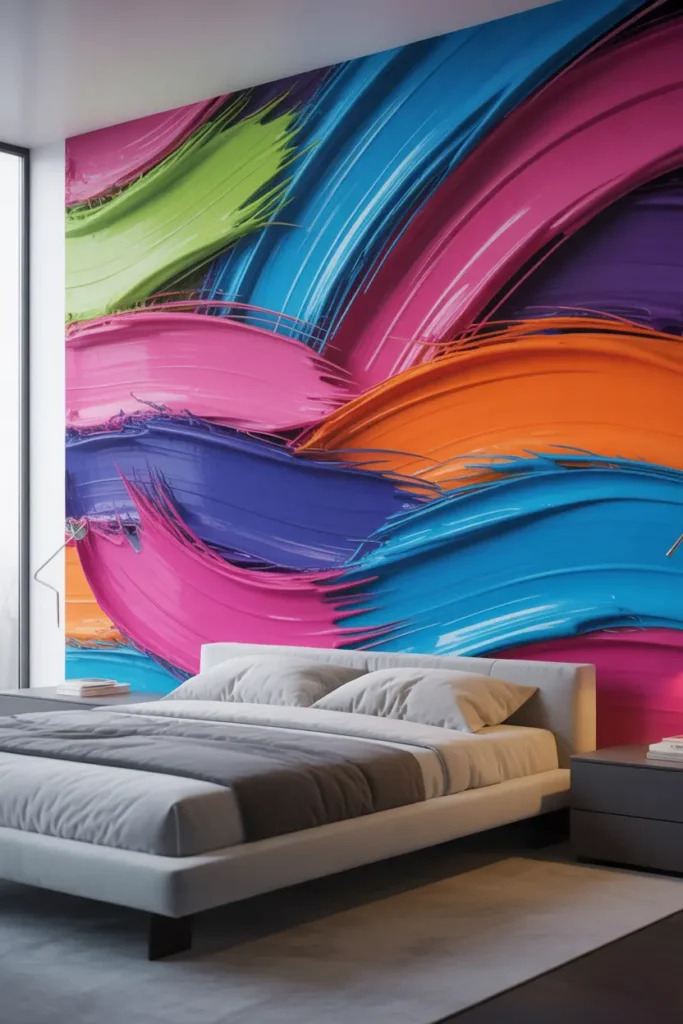
An abstract brush stroke wall is a fun and creative DIY painting idea that brings energy and personality to any room. The overlapping strokes create movement and texture, making the wall visually dynamic and engaging. This technique encourages experimentation—you can mix bold colors for a lively look or soft tones for subtle elegance. It’s beginner-friendly because imperfection enhances the handmade appeal. Abstract strokes work well behind beds, desks, or in open spaces, instantly transforming plain walls into art pieces. This approach allows freedom, creativity, and a visually striking result that brightens the room with minimal effort.
What makes this DIY painting idea appealing is its flexibility—you can focus on one accent wall or cover multiple walls for a gallery-style effect. Adjust brush sizes and stroke directions to create unique textures. Pair with minimal décor to keep the wall as the focal point or mix with complementary art pieces. This budget-friendly project requires basic materials but delivers high visual impact, turning any bedroom or creative space into a Pinterest-worthy haven. Abstract brush stroke walls are perfect for showcasing your artistic flair while adding vibrancy, depth, and personality to your home.
11. Silhouette Trees
Materials Needed:
- Background wall paint
- Black or dark paint for silhouettes
- Brushes (small and medium)
- Pencil for sketching
Steps:
- Paint the wall with a gradient background
- Sketch tree shapes lightly with a pencil
- Fill in tree silhouettes with black or dark paint
- Add branches and finer details
- Let dry and touch up edges
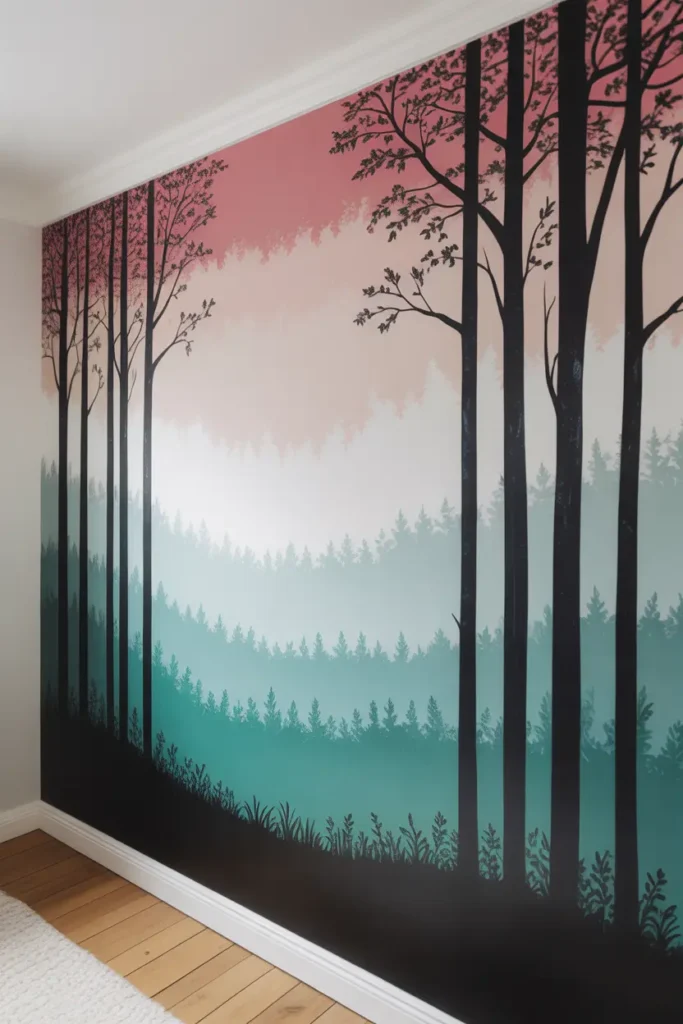
Silhouette tree walls are a beautiful way to bring nature and artistry into your home. The contrast of dark trees against soft backgrounds creates depth and a serene atmosphere. This DIY painting idea works wonderfully in bedrooms or living spaces, adding a calming visual focus. Even beginners can attempt this by starting with simple tree shapes and gradually adding details. It’s an ideal project for anyone who loves nature-inspired décor and wants a unique, Pinterest-worthy wall that makes the room feel cozy and visually striking without clutter or overly complex techniques.
The flexibility of silhouette tree designs allows you to experiment with size, density, and style. You can create a sparse forest or a dense woodland scene, depending on your preference. Pairing the wall with neutral furniture and soft textiles ensures the painted forest remains the focal point. This DIY painting idea is budget-friendly and can transform a plain wall into a captivating statement. It encourages creativity while enhancing your room’s brightness and mood, giving the space a natural, peaceful, and artistic charm that’s perfect for Pinterest-inspired bedrooms or cozy living areas.
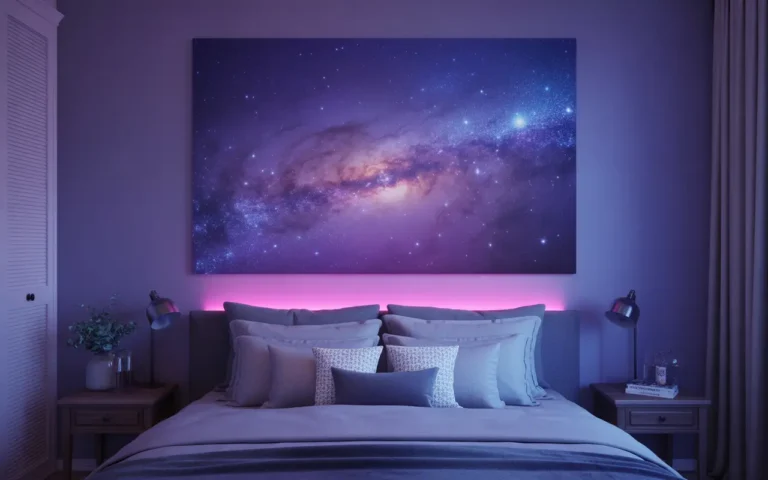
12. Simple Galaxy
Materials Needed:
- Dark blue, purple, and black paint
- White paint for stars
- Sponges and brushes
- Optional: glitter or metallic paint
Steps:
- Paint the wall dark blue or black as a base
- Use sponges to blend purple and lighter blue clouds
- Add stars with a fine brush or splatter technique
- Layer colors to create depth
- Optionally, sprinkle glitter or metallic paint for shine
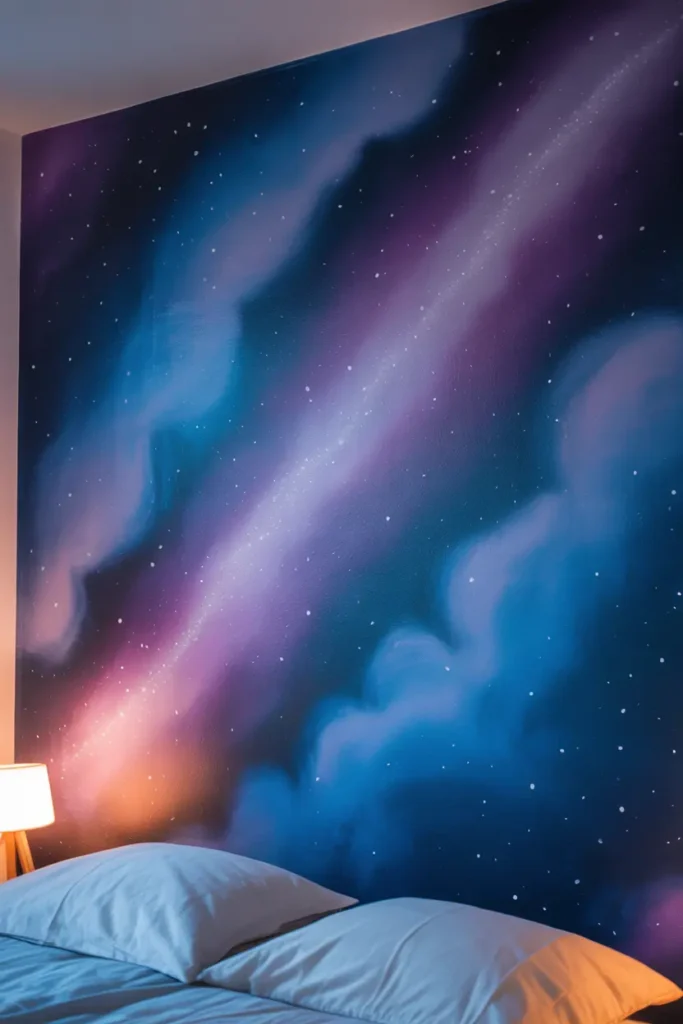
A simple galaxy wall brings cosmic beauty to any room, creating a dreamy and inspiring atmosphere. The layered colors mimic nebulae and celestial clouds, while scattered stars add sparkle and magic. This DIY painting idea is beginner-friendly—imperfections in blending create a natural, handcrafted look. It’s perfect for bedrooms, playrooms, or creative spaces, adding depth and visual interest. You can customize the colors to match the room’s décor, whether you prefer soft pastel galaxies or bold, vibrant cosmic skies. This approach turns a plain wall into a stunning focal point full of wonder and creativity.
Galaxy walls encourage experimentation with color blending and layering techniques. Adding metallic or glitter accents enhances the depth and makes the stars shimmer, giving the wall a professional, finished look. The project is highly flexible: you can focus on one wall for a subtle accent or cover the entire room for an immersive experience. This DIY painting idea is budget-friendly and perfect for Pinterest-inspired bedrooms. It inspires creativity and provides a unique, visually stunning backdrop that transforms the space into a magical, cosmic retreat while keeping it stylish, calming, and personal.
13. Floating Geometric Shapes
Materials Needed:
- Acrylic wall paints in multiple colors
- Painter’s tape or stencils
- Brushes or small rollers
- Pencil for sketching
Steps:
- Paint the base wall in a neutral color
- Lightly sketch geometric shapes in desired locations
- Tape edges or use stencils for precision
- Paint shapes in selected colors
- Remove tape and touch up edges
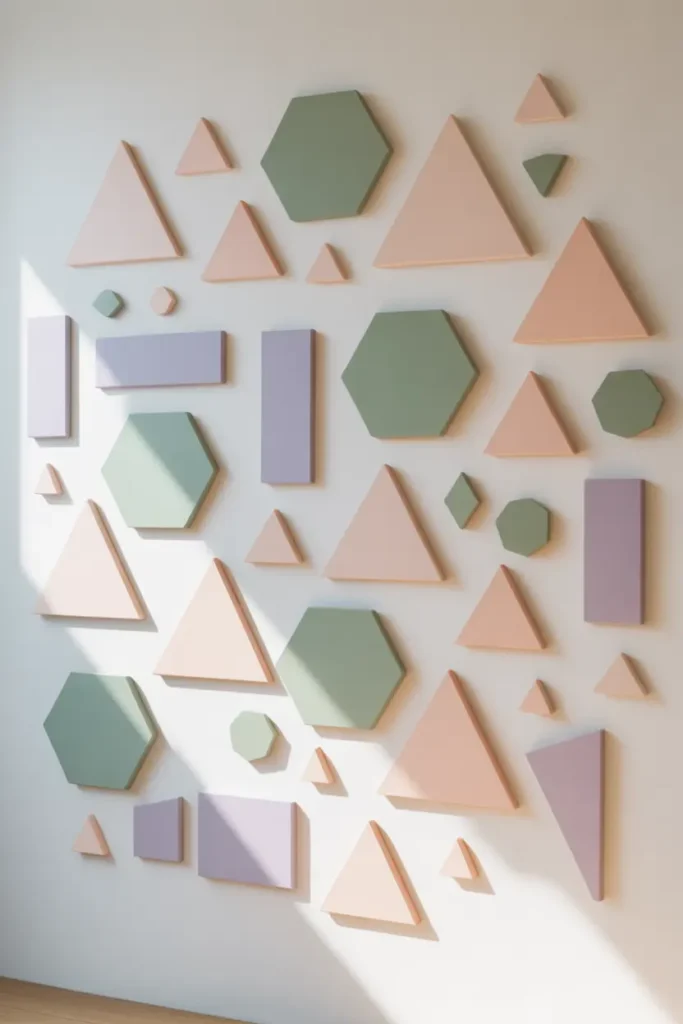
Floating geometric shapes are a modern DIY painting idea that adds personality and vibrancy to a room. The random yet balanced placement of shapes creates visual interest while keeping the design minimal and contemporary. It’s ideal for bedrooms or creative spaces, where the abstract forms can complement furniture and décor. Beginners can start with simple shapes like triangles or rectangles and gradually incorporate more complex designs. This approach encourages creativity, allows flexibility with color combinations, and transforms a plain wall into a Pinterest-worthy accent, showcasing modern artistry and playful sophistication.
The floating geometric design allows endless customization. You can stick to pastel shades for subtle elegance or use bold, contrasting colors for dramatic effect. It pairs beautifully with minimalist décor and can even be extended across multiple walls for a gallery-style look. This DIY painting project is easy to execute with painter’s tape or stencils and requires minimal materials. It’s a cost-effective way to brighten any bedroom or studio, adding a contemporary and artistic touch while letting your personality shine through.
14. Abstract Brush Strokes

Materials Needed:
- Multiple acrylic paints
- Wide and medium brushes
- Canvas or wall-safe primer (optional)
- Mixing tray
Steps:
- Select a color palette
- Apply overlapping brush strokes randomly
- Layer colors for contrast and depth
- Blend some edges if desired
- Let dry completely
Abstract brush stroke walls are perfect for creative and bold DIY painting ideas. The overlapping strokes create texture, movement, and energy, transforming a simple bedroom wall into a statement piece. This approach allows artistic freedom—there’s no need for precision, making it ideal for beginners. You can mix colors to match existing décor or use contrasting shades to create drama. The randomness of the strokes ensures each wall is unique. This technique also allows you to experiment with brush sizes, directions, and layering, providing a fun and expressive way to refresh your space and brighten the room effortlessly.
Abstract brush stroke designs are versatile and visually impactful. They work well on one accent wall behind the bed or across multiple walls for an immersive effect. This DIY painting idea requires minimal materials yet delivers professional-looking results. Pair with neutral furniture or simple decorative accents to highlight the artwork. It’s an affordable and beginner-friendly project that adds personality and vibrancy to any bedroom, making the space Pinterest-ready. The abstract strokes inspire creativity while offering a bold and colorful backdrop that brightens the room and enhances its artistic atmosphere.
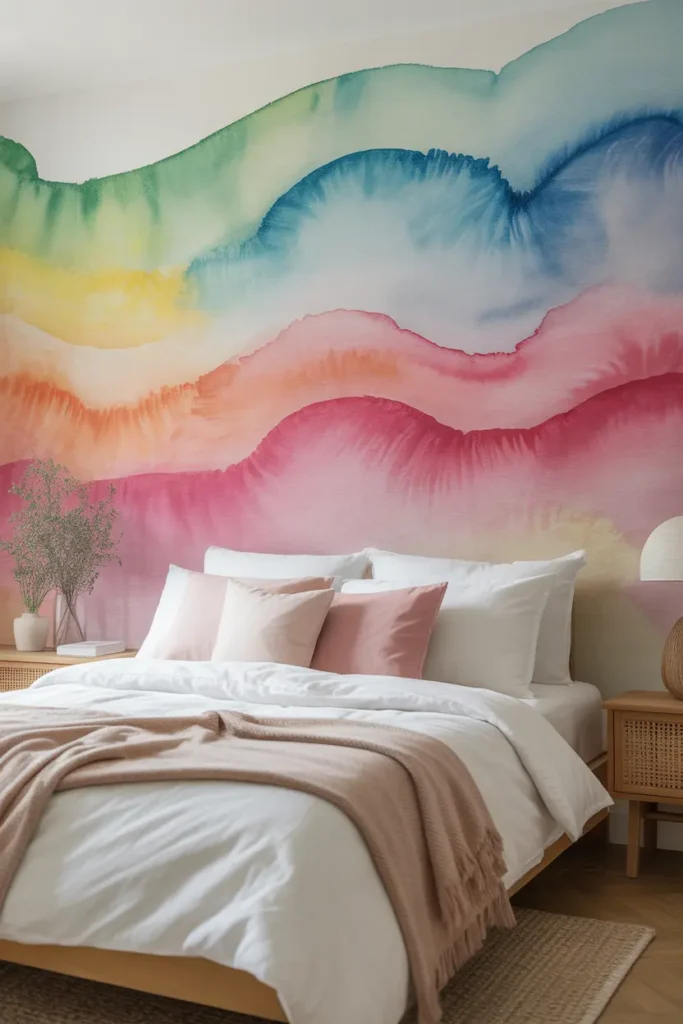
15. Rainbow Gradient Wall

Materials Needed:
- Multiple wall paints in rainbow colors
- Brushes and sponges
- Mixing tray
- Painter’s tape (optional)
Steps:
- Paint the wall with a white or neutral base
- Apply the first color at the starting point
- Blend adjacent colors gradually for smooth transitions
- Continue through the rainbow sequence
- Touch up edges and allow to dry
Rainbow gradient walls are a cheerful and eye-catching DIY painting idea. The smooth transition of colors adds energy, joy, and visual interest to any bedroom or creative space. It’s a beginner-friendly technique, as blending doesn’t need to be perfect—slight imperfections enhance the handmade appeal. This wall design is perfect for accent walls, children’s rooms, or hobby studios, offering a vibrant backdrop that brightens the environment. By experimenting with different color combinations or muted rainbow tones, you can customize the wall to match your personal style, creating a fun, modern, and Pinterest-worthy space.
The rainbow gradient effect allows flexibility in execution and color choices. You can extend the gradient across the entire wall or focus on a smaller section for subtle impact. Pairing with neutral furnishings or simple décor ensures the vibrant wall remains the focal point. This DIY painting idea is cost-effective, beginner-friendly, and perfect for energizing a bedroom or creative area. The result is a colorful, playful, and stylish feature that transforms any space, adding personality, brightness, and charm while inspiring creativity and positivity in the room.
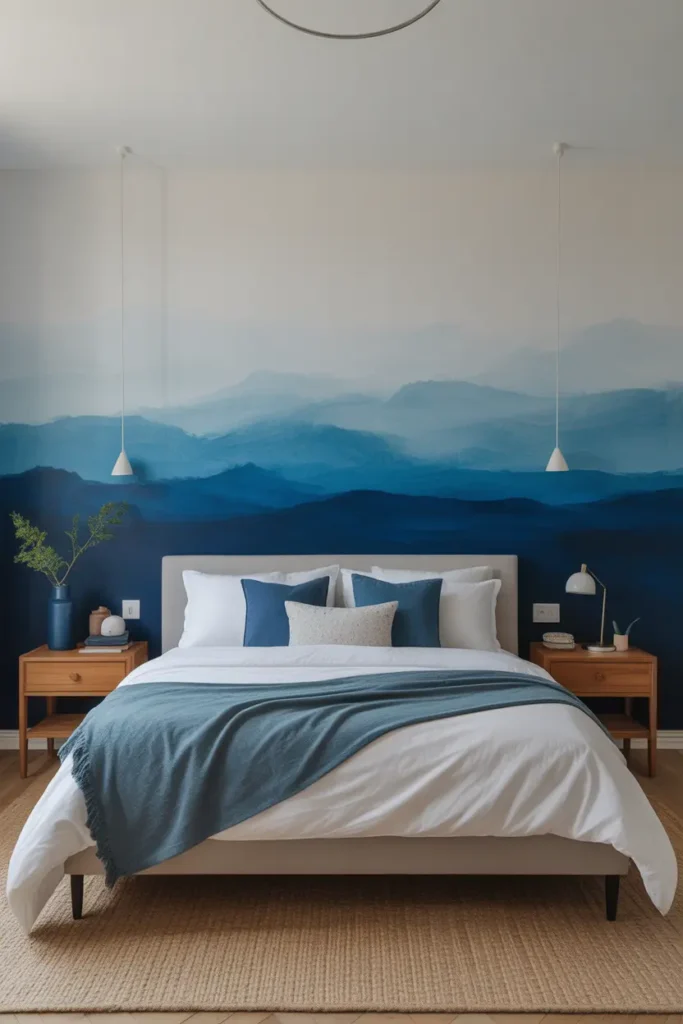
16. Ombre Vertical Stripes
Materials Needed:
- Wall paints in gradient shades
- Painter’s tape
- Brushes and sponges
- Mixing tray
Steps:
- Mark vertical stripes with painter’s tape
- Paint the top stripe with the darkest shade
- Gradually blend lighter shades downward
- Repeat for all stripes
- Remove tape and touch up edges
Ombre vertical stripes are a sophisticated DIY painting idea that adds both height and style to any bedroom. The gradient effect draws the eye upward, creating a spacious and airy feel. It’s an ideal technique for accent walls, offering a modern twist without overwhelming the room. Beginners can start with two or three shades and blend them for a smooth transition. The stripes add structure while maintaining softness through the gradient, making the wall visually interesting. This project allows customization with your favorite color palette, creating a unique, Pinterest-worthy statement that enhances the overall vibe of the space.
This painting idea also pairs well with minimalist furniture and neutral décor, letting the wall remain the focal point. The vertical ombre effect can be subtle with soft pastel hues or bold with vibrant colors for a dramatic statement. It’s a budget-friendly, beginner-friendly project that can transform a plain wall into a stunning feature. With careful taping, blending, and layering, the final result looks professional. Ombre vertical stripes are versatile, visually appealing, and perfect for bedrooms, playrooms, or creative corners where you want a stylish, artistic accent without complicated techniques.
17. Watercolor Wash Wall Effect
Materials Needed:
- Watered-down paint
- Wide brushes and sponges
- Spray bottle
- Mixing containers
Steps:
- Lightly dampen the wall
- Apply diluted paint in patches
- Blend edges with sponge
- Layer colors gradually
- Let dry completely
The watercolor wash technique gives walls a soft, ethereal look that feels light and elegant. It’s perfect for people who love artistic décor but don’t want heavy patterns or rigid lines. Diluted paint creates transparent layers that blend seamlessly, giving the room a relaxing and creative vibe. Colors like sky blue, lavender, soft peach, or sage green work beautifully for this effect. It’s ideal for bedrooms, studios, or reading nooks, creating a calm, dreamy atmosphere while adding a handcrafted, Pinterest-worthy look.
What makes this idea appealing is its flexibility—there’s no strict pattern or rules. You can layer multiple colors or keep it monochromatic for subtle elegance. The technique also hides minor wall imperfections, as the soft, flowing texture looks intentional. Adding metallic or pearlescent paints can enhance depth and visual interest. This DIY painting idea is perfect for beginners, easy on the budget, and gives a unique, handcrafted finish. It transforms plain walls into artistic backdrops, making bedrooms feel serene, stylish, and inspiring.
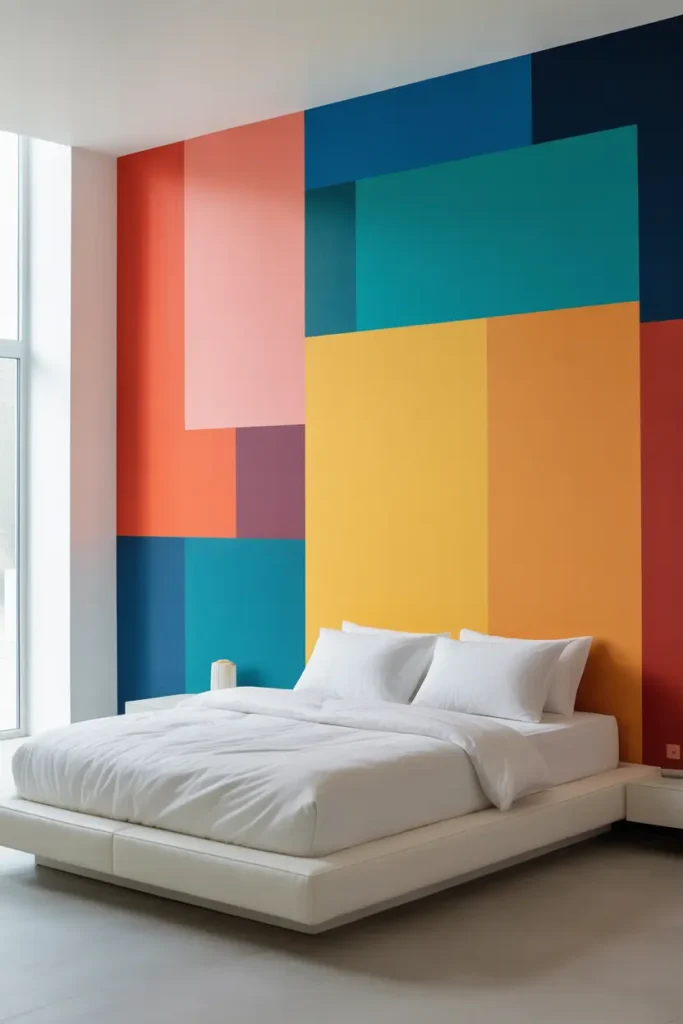
18. Bold Color Blocking
Materials Needed:
- Multiple wall paints
- Painter’s tape
- Brushes and rollers
- Mixing tray
Steps:
- Plan color block layout
- Tape edges to create clean lines
- Paint each block carefully
- Apply second coat if necessary
- Remove tape and touch up edges
Bold color blocking is an energetic DIY painting idea that instantly transforms a wall. Using large contrasting blocks creates visual interest while keeping the design simple and modern. Beginners can experiment with different shapes and color combinations, making the process creative and fun. This technique is perfect for accent walls in bedrooms, offices, or studios, adding a pop of color and personality. The clean lines and vibrant shades produce a professional, Pinterest-worthy result that brightens the room while allowing flexibility in style and color selection.
Color blocking works with complementary or contrasting colors to create unique, eye-catching designs. It’s versatile—you can use pastel tones for a soft look or bold primaries for a dramatic statement. The painter’s tape ensures clean edges and easy execution, making it beginner-friendly. This DIY painting idea is cost-effective and allows customization to suit any room’s theme. It’s ideal for adding visual impact to a single wall or creating a modern gallery-style look. Bold color blocking energizes a space, making it vibrant, artistic, and perfect for Pinterest-inspired interiors.
19. Floating Clouds Wall
Materials Needed:
- White and light blue paint
- Brushes and sponges
- Pencil for sketching
Steps:
- Paint the wall a light blue base
- Sketch cloud shapes lightly
- Fill in clouds with white paint
- Blend edges for softness
- Let dry completely
Floating cloud walls are a whimsical and charming DIY painting idea. The soft shapes add depth, serenity, and playfulness to any bedroom or creative space. Using sponges or brushes, you can create fluffy, airy clouds that look realistic and artistic. This technique is beginner-friendly, as the clouds do not require precision. Ideal for children’s rooms or cozy nooks, the design adds a dreamy atmosphere while remaining easy to execute. It allows experimentation with scale and placement, creating a visually interesting and Pinterest-worthy wall.
The floating cloud technique also pairs beautifully with pastel décor or neutral furnishings. You can add subtle gradients to the clouds for extra depth or keep them simple for a clean, minimalist effect. This DIY painting project is cost-effective, beginner-friendly, and customizable for any room size or style. It encourages creativity and transforms plain walls into enchanting, atmospheric backdrops. Perfect for bedrooms, playrooms, or creative studios, it brightens the space, adding personality, charm, and a soft, artistic aesthetic.
20. Metallic Accent Strokes
Materials Needed:
- Metallic acrylic paints
- Neutral base paint
- Brushes (various sizes)
- Painter’s tape (optional)
Steps:
- Paint wall in neutral base color
- Sketch or plan metallic stroke placement
- Apply metallic paint in bold strokes
- Layer for intensity
- Let dry completely
Metallic accent strokes add a touch of glamour and sophistication to any wall. The reflective finish catches light, creating dynamic interest and depth, perfect for accent walls in bedrooms or creative spaces. This DIY painting idea is beginner-friendly and flexible—you can experiment with size, placement, and metallic shades to create a unique design. Metallic accents pair well with minimalist furniture and décor, creating a modern, chic look. The bold strokes make the wall visually appealing while maintaining simplicity, giving a high-end feel without professional assistance.
The metallic strokes technique allows for endless creativity and customization. You can mix gold, silver, or copper for a multi-dimensional effect or keep it single-toned for elegance. It’s ideal for those seeking a stylish, contemporary accent that complements existing room décor. This DIY painting idea is budget-friendly, beginner-friendly, and perfect for transforming a plain wall into a Pinterest-worthy feature. Whether over the bed, behind a reading nook, or in a studio, metallic strokes bring sophistication, shine, and a modern artistic flair to your space.
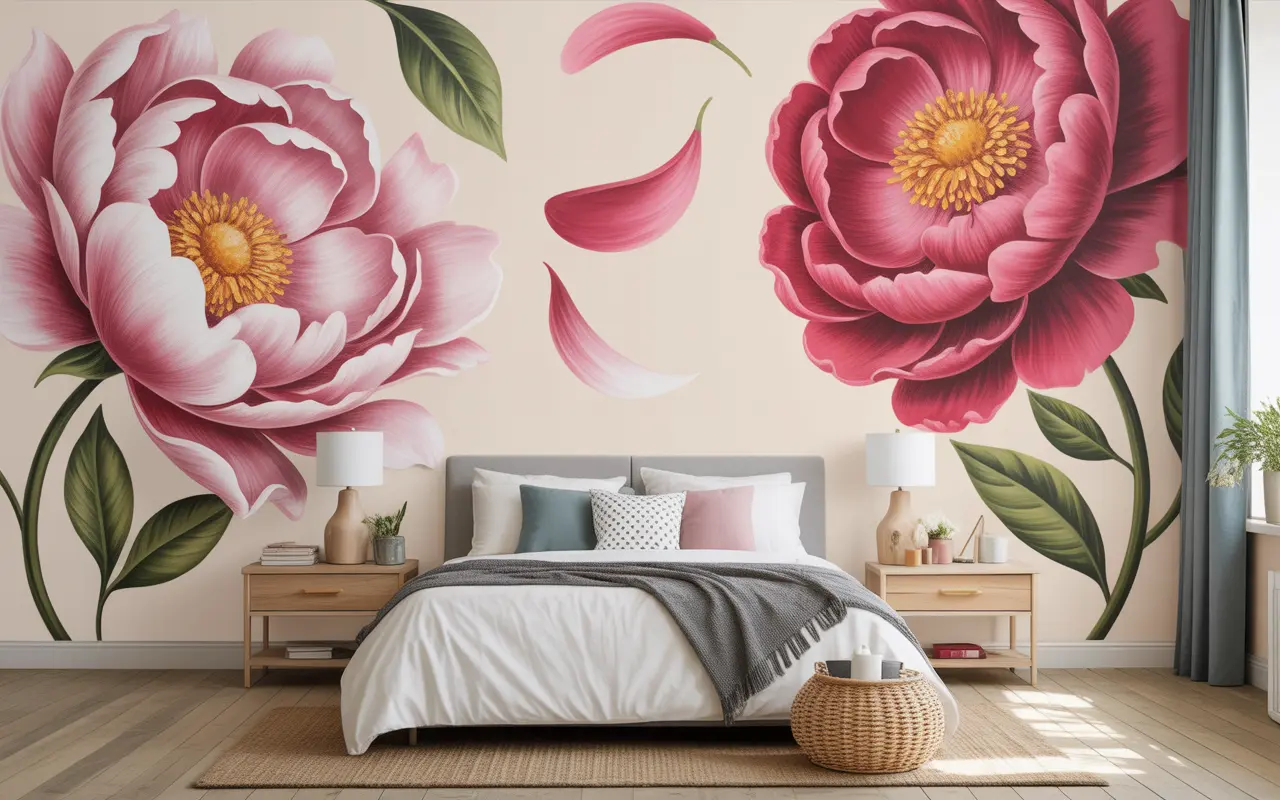
21. Giant Floral Wall
Materials Needed:
- Acrylic paints in floral colors
- Brushes (medium and fine)
- Pencil for sketching outlines
Steps:
- Sketch large floral shapes lightly on wall
- Fill petals with base colors
- Add shading and highlights
- Blend edges for realism
- Let dry completely
Giant floral walls are a stunning DIY painting idea that instantly transforms any bedroom or creative space. The oversized flowers create a bold statement while adding freshness, elegance, and charm. Beginners can start with simple shapes and build complexity gradually. This technique allows for experimentation with colors, blending, and shading, creating a handcrafted look that rivals professional murals. It’s ideal for creating a Pinterest-worthy accent wall, where the artistic flowers become the room’s focal point and enhance the overall décor.
This DIY painting idea encourages creativity and personalization. You can choose soft pastels for a calming atmosphere or bright, vibrant colors for a playful effect. Pair with neutral furniture and subtle décor to highlight the floral artwork. The project is cost-effective, beginner-friendly, and visually impactful. Giant floral walls make the space feel lively, artistic, and welcoming. Perfect for bedrooms, studios, or creative corners, this design adds elegance, personality, and a high-end, Pinterest-ready look to your home.
Conclusion
With these 21 DIY painting ideas, brightening your walls has never been easier or more fun. Each project combines creativity, style, and accessibility, allowing anyone to craft stunning, personalized artwork. From bold abstract designs to soft, dreamy effects, your walls can become a reflection of your unique taste and home vibe. Start with one project today and enjoy the satisfaction of transforming plain spaces into vibrant, Pinterest-worthy walls that impress every guest.