25 DIY Gift Ideas Everyone Will Absolutely Love
Looking for unique, thoughtful gifts that leave a lasting impression? These 25 DIY gift ideas are perfect for beginners and creative enthusiasts alike. From personalized photo coasters and scented candles to handmade soaps and memory jars, each project is designed to be simple, affordable, and visually stunning. Whether it’s for birthdays, holidays, or just because, these crafts let you add a personal touch to every present. Explore these fun, easy-to-make projects and wow your friends and family with handmade gifts they’ll treasure forever.
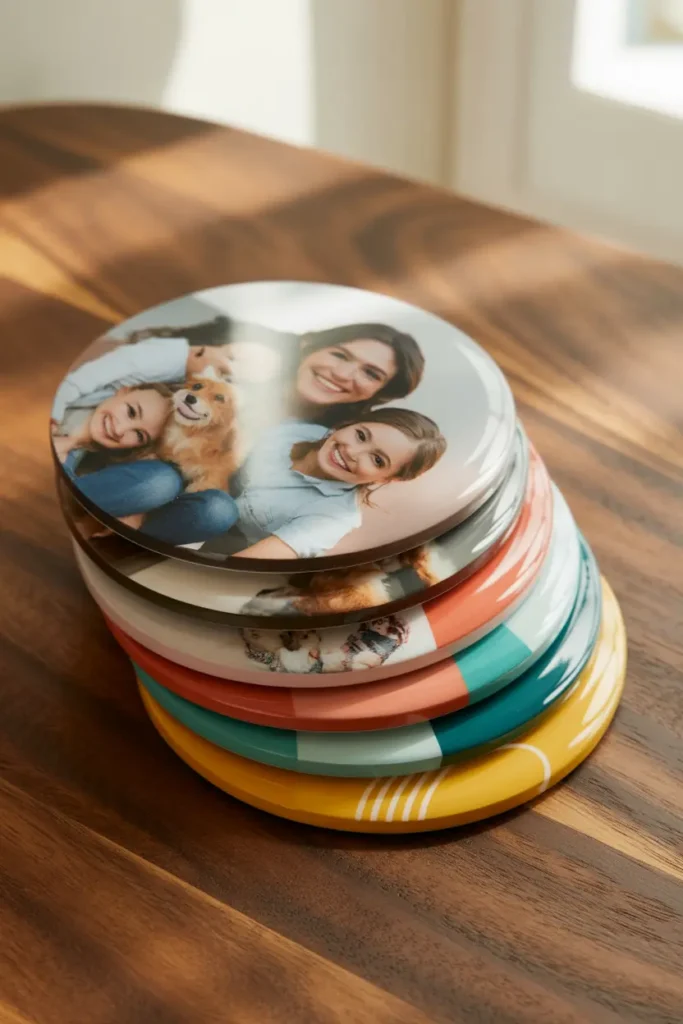
1. Personalized Photo Coasters

Materials Needed:
- Plain cork or wooden coasters
- Printed photos
- Mod Podge or clear sealant
- Brush or sponge applicator
- Scissors or craft knife
Steps:
- Cut printed photos to match the size of the coaster.
- Apply a thin layer of Mod Podge to the coaster surface.
- Place the photo on top and smooth out bubbles.
- Add a second layer of Mod Podge over the photo to seal.
- Allow to dry completely before gifting.
Personalized photo coasters are a simple yet heartfelt DIY gift idea. They let you showcase cherished memories and add a custom touch to anyone’s home décor. Even beginners can create them with minimal materials, and the glossy finish gives a professional look. You can use family photos, pet pictures, or snapshots from special occasions. This project allows you to combine creativity and practicality, resulting in a gift that’s both meaningful and useful.
To elevate the design, try adding glitter, washi tape, or hand-lettered names around the edges. These coasters can also be paired with a matching mug or tea set for a coordinated gift bundle. The best part is that each set is unique, reflecting your personal style and the recipient’s personality. They’re perfect for birthdays, anniversaries, or holiday gifts, and their compact size makes them easy to mail or wrap. Personalized photo coasters are a classic, DIY-friendly gift that always impresses.
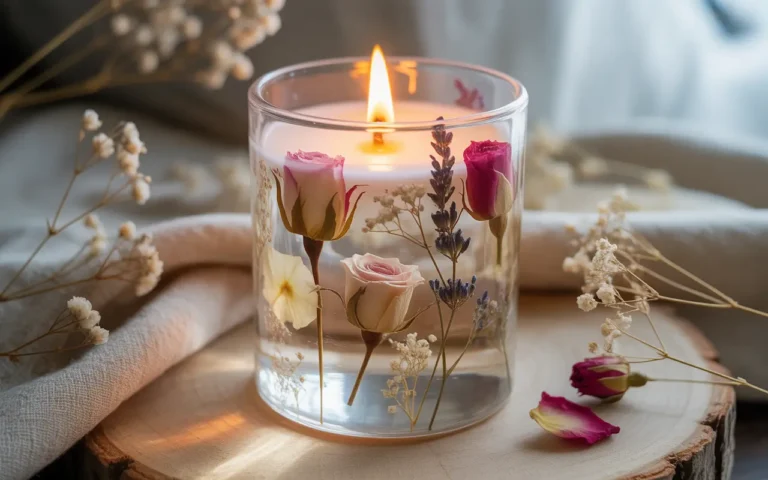
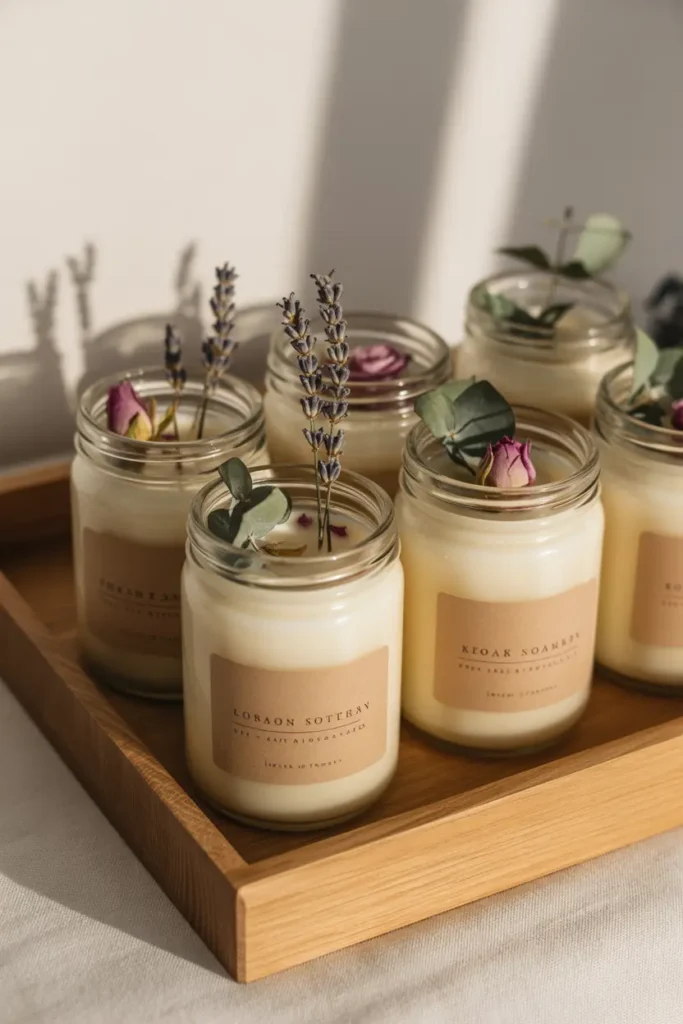
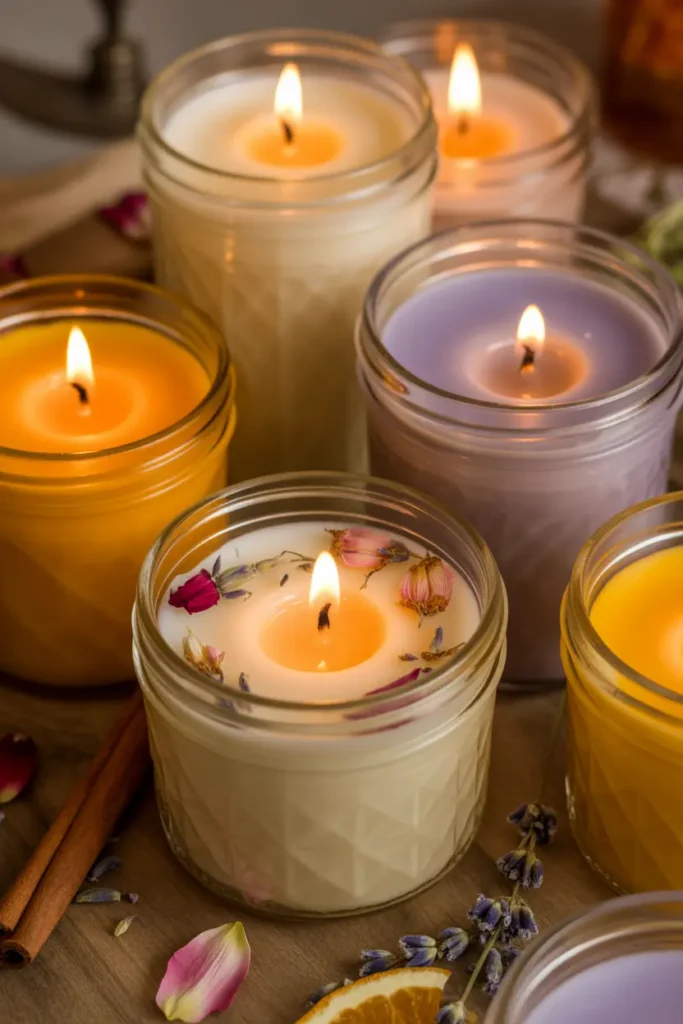
2. Scented Soy Candles

Materials Needed:
- Soy wax flakes
- Candle wicks
- Glass jars or containers
- Fragrance oils
- Double boiler or microwave-safe container
- Stirring utensil
Steps:
- Melt soy wax flakes in a double boiler or microwave.
- Add fragrance oil once melted and stir gently.
- Place wick in center of jar and secure.
- Pour melted wax into the jar.
- Allow to cool and trim wick to desired length.
Scented soy candles are a timeless DIY gift idea that adds warmth and personality to any space. They’re easy to make, customizable, and perfect for beginners. By mixing different fragrance oils, you can create signature scents that reflect the recipient’s tastes. Using glass jars makes the candles visually appealing, and ribbons or labels add a polished, gift-ready finish. These candles can be enjoyed for relaxation, aromatherapy, or simply to brighten up a room with their glow and scent.
You can also layer colors or scents to create multi-layered or ombre effects for a more artistic presentation. Soy wax burns cleaner than traditional paraffin and is eco-friendly, making it a thoughtful gift choice. Pairing your candle with a handwritten note or small gift box elevates the experience. Whether for birthdays, housewarming parties, or holiday celebrations, scented soy candles are practical, decorative, and deeply personal. They’re a simple, elegant way to impress anyone with your creativity and care.
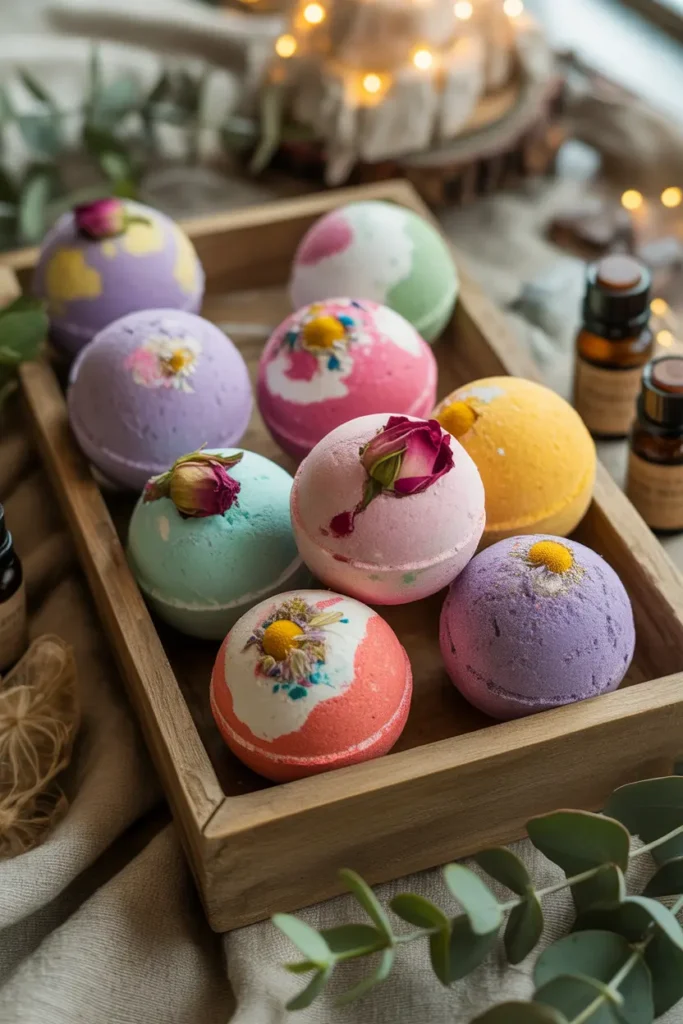
3. Handmade Bath Bombs
Materials Needed:
- Baking soda
- Citric acid
- Cornstarch
- Epsom salts
- Essential oils
- Water or witch hazel spray
- Silicone molds
Steps:
- Mix dry ingredients (baking soda, citric acid, cornstarch, Epsom salts) in a bowl.
- Add essential oils and a few drops of water or witch hazel.
- Blend until mixture holds together when pressed.
- Pack mixture into silicone molds firmly.
- Let dry 24 hours before removing from molds.
Handmade bath bombs are an indulgent DIY gift that anyone will appreciate. They offer a fun sensory experience with fizzing bubbles, fragrances, and colors. Beginners will enjoy the simplicity of the mold-based method, which produces professional-looking results without special equipment. You can customize scents, colors, and decorations such as dried flowers, glitter, or essential oil blends. These bath bombs are perfect for self-care enthusiasts or as thoughtful, unique gifts for friends and family.
Bath bombs also make excellent party favors or holiday presents due to their aesthetic appeal and versatility. You can package them individually in clear wraps with ribbons or create themed sets in gift boxes. By experimenting with different textures, scents, and colors, each bath bomb can feel personalized and luxurious. They’re easy to produce in bulk yet remain charming and handmade. This DIY gift idea combines creativity, relaxation, and practicality, making it a perfect way to delight loved ones.
4. Custom Painted Mugs

Materials Needed:
- Plain ceramic mugs
- Ceramic or porcelain paint pens
- Oven for curing
- Pencil (optional for sketching)
- Rubbing alcohol (for cleaning surface)
Steps:
- Clean mug surface with rubbing alcohol.
- Sketch your design lightly with a pencil if needed.
- Decorate using ceramic paint pens.
- Let paint dry according to pen instructions.
- Bake mug in the oven if required to set paint.
Custom painted mugs are a fun and functional DIY gift idea. They allow for full personalization, from quotes and patterns to abstract designs. Beginners can start with simple patterns or stencils and gradually try more complex artwork. Once cured, these mugs are dishwasher-safe and ready for daily use. They’re perfect for coffee or tea lovers, office coworkers, or anyone who appreciates handmade creativity. The beauty of this project is that each mug is truly one-of-a-kind, reflecting the giver’s artistic touch and thoughtfulness.
You can also create themed mug sets for holidays, birthdays, or special occasions. Pairing a painted mug with hot cocoa mix or tea bags enhances its gift appeal. For an extra personal touch, add the recipient’s name or favorite quote. This DIY project combines creativity and practicality, offering a heartfelt present that will be cherished daily. Even beginners can achieve stunning results with practice and a steady hand, making custom mugs a perfect entry-level craft for meaningful gifts.
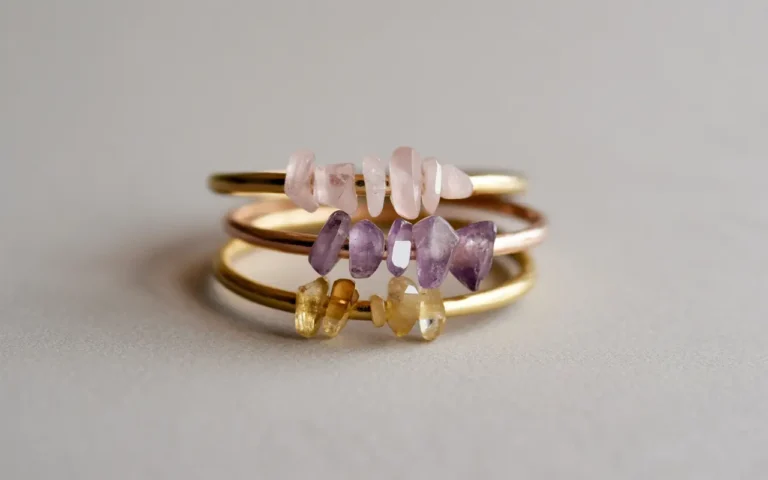
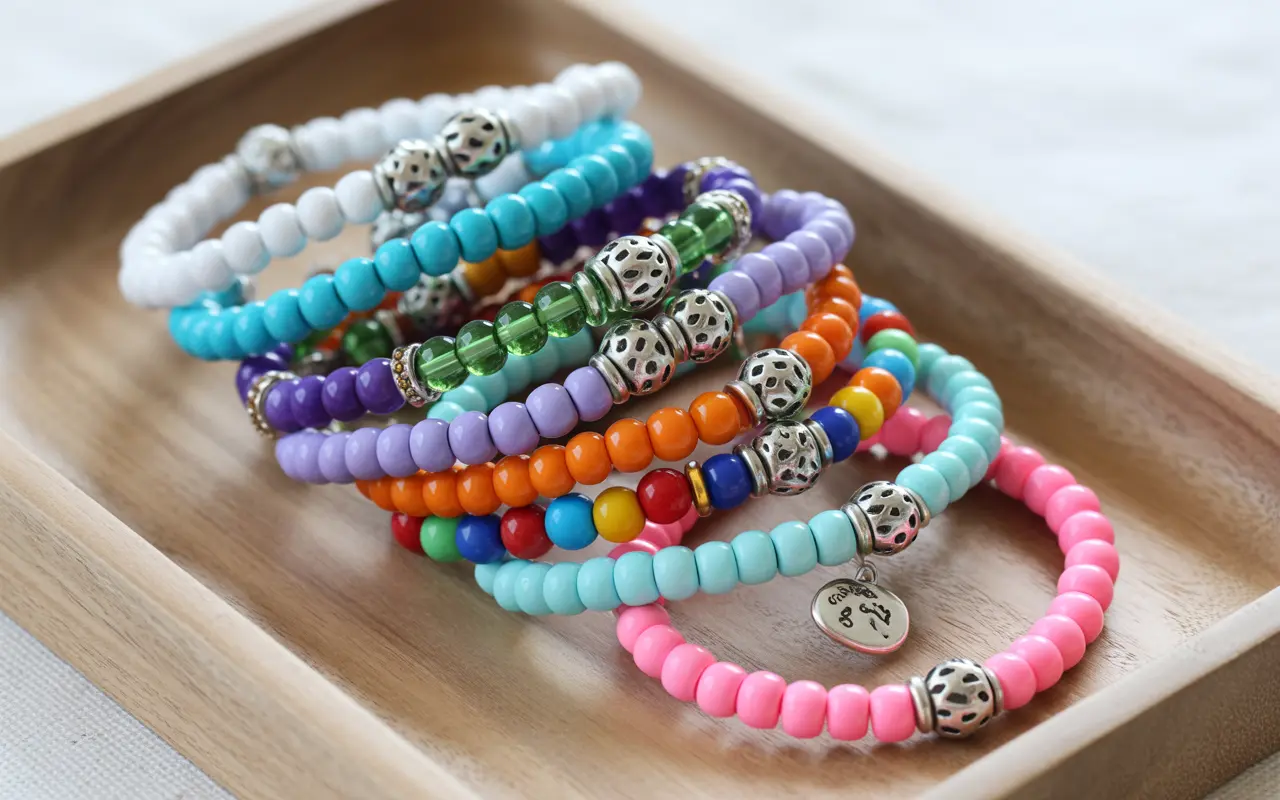
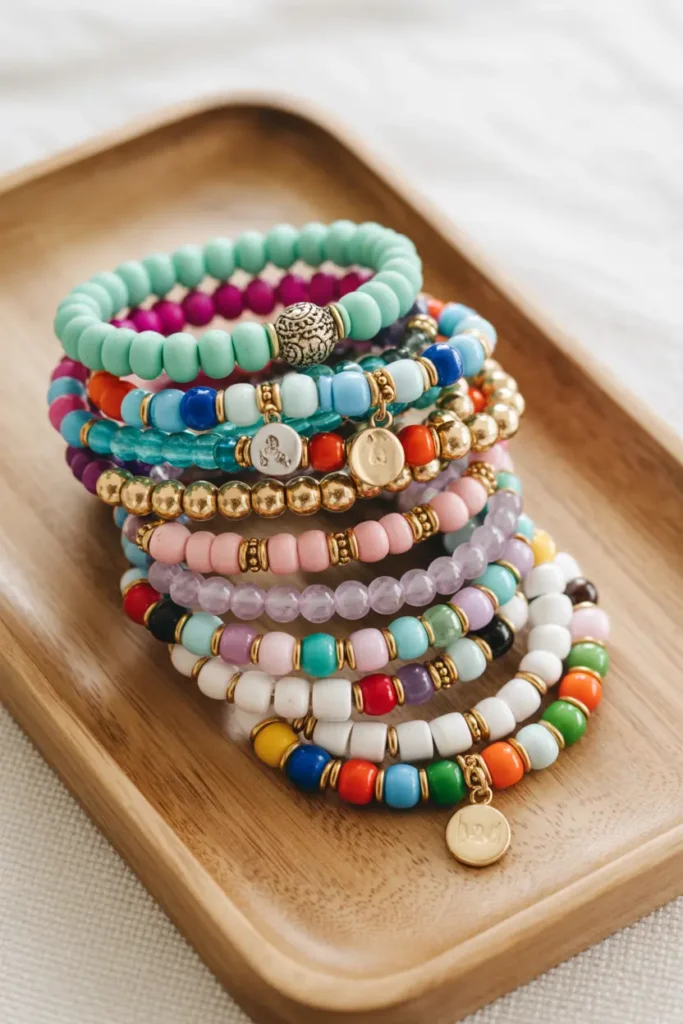
5. Handmade Beaded Bracelets
Materials Needed:
- Elastic jewelry cord
- Glass or acrylic beads
- Charms or pendants (optional)
- Scissors
- Jewelry glue (optional)
Steps:
- Measure wrist size and cut elastic cord accordingly, adding extra for knots.
- String beads and charms in desired pattern.
- Tie a secure knot to close the bracelet.
- Add a dab of jewelry glue to secure knot if needed.
- Trim excess cord.
Handmade beaded bracelets are a charming and beginner-friendly DIY gift idea. They offer endless customization options in color, pattern, and style, making each bracelet unique. This project is perfect for crafting gifts for friends, family, or party favors. Elastic cords make it easy to fit any wrist size, and adding charms creates extra personality. The process is simple, yet the result is visually impressive and highly personal, showing the recipient that you made the gift with care and creativity.
You can mix and match beads for a playful, vibrant look or create elegant, minimalist designs for a more sophisticated style. Beaded bracelets are also great for crafting in bulk for parties, holiday gifts, or small handmade business ideas. They’re lightweight, easy to package, and perfect for gifting on any occasion. This DIY project is accessible for all skill levels while allowing endless experimentation with colors and textures, making it an ideal choice for anyone looking to create thoughtful, handmade gifts.
6. Embroidered Hoop Art

Materials Needed:
- Embroidery hoop
- Fabric (cotton or linen)
- Embroidery floss
- Needles
- Scissors
- Pencil (for sketching design)
Steps:
- Place fabric in the embroidery hoop and tighten.
- Lightly sketch your design on the fabric.
- Use embroidery floss and needle to stitch your design.
- Trim excess thread and fabric edges if needed.
- Display or gift as is, or back with felt for a polished look.
Embroidered hoop art is a charming DIY gift that combines creativity with home décor. Beginners can start with simple shapes, letters, or floral patterns, gradually experimenting with more intricate designs. The finished piece can be hung on walls, doors, or shelves, adding a personal touch to any space. Using soft colors and clean lines ensures a modern, handmade aesthetic that’s perfect for gifting. This project encourages mindfulness and patience while producing a visually stunning result that looks professionally crafted.
You can customize hoop art to reflect the recipient’s favorite colors, motifs, or initials, making it deeply personal. Combining multiple small hoops creates a gallery-style arrangement, ideal for a unique wall display. Embroidered art is lightweight, easy to ship, and perfect for all occasions including birthdays, holidays, or housewarmings. With a little practice, this DIY project offers an impressive, handmade gift that communicates effort, care, and thoughtful design.
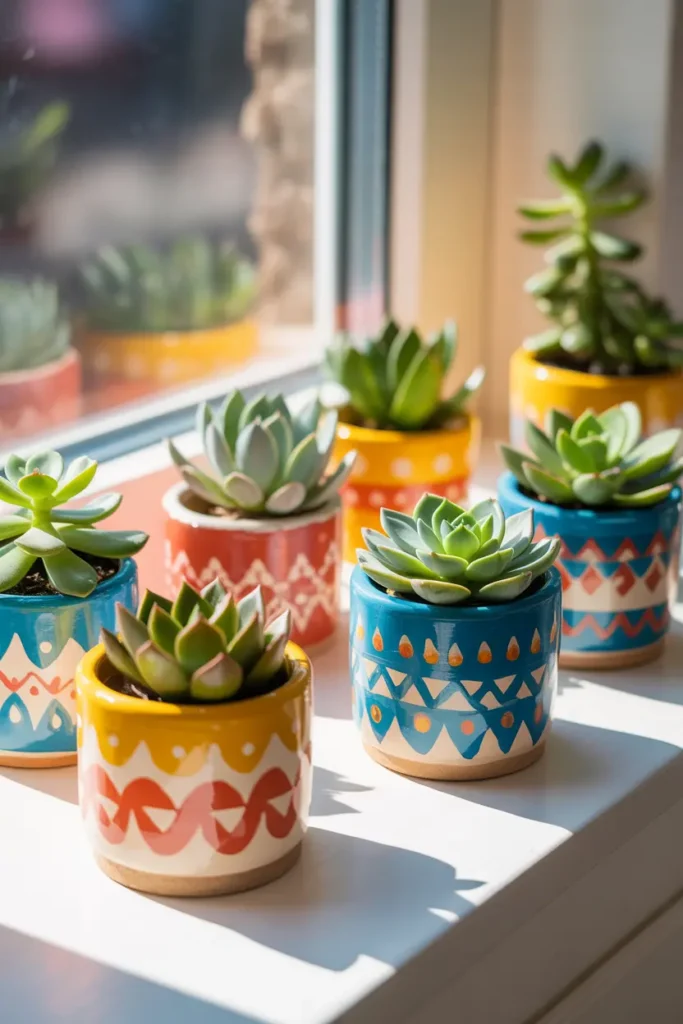
7. DIY Terrarium Kit
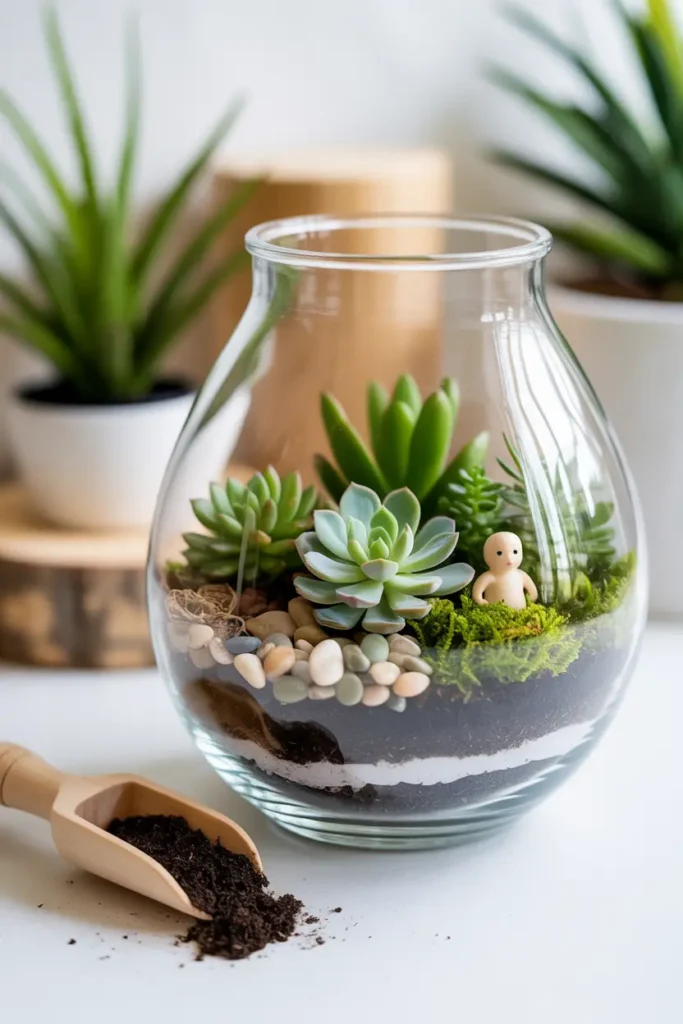
Materials Needed:
- Glass terrarium or jar
- Small pebbles
- Activated charcoal (optional for drainage)
- Potting soil
- Succulents or air plants
- Miniature decorations (optional)
- Small scoop or spoon
Steps:
- Layer small pebbles and activated charcoal at the bottom of the terrarium.
- Add potting soil on top.
- Plant succulents or air plants carefully.
- Arrange miniature decorations as desired.
- Mist lightly and close if using a sealed terrarium.
A DIY terrarium kit is a creative and versatile gift that brings nature indoors. Terrariums are low-maintenance, visually appealing, and perfect for anyone with limited space. Beginners can enjoy layering stones, soil, and plants to create a miniature landscape that’s both decorative and functional. Adding small figurines or themed elements personalizes the gift, making it unique. Terrariums work well on desks, windowsills, or coffee tables, offering a calm, green touch that brightens any room.
Terrariums are also excellent for gifting because they are hands-on yet forgiving; plants can be rearranged or replaced easily. You can create multiple kits for birthdays, holidays, or office gifts. Each kit can include care instructions, enhancing the experience for the recipient. By choosing colorful succulents, moss textures, and decorative stones, you can craft a miniature ecosystem that’s visually striking and relaxing. A DIY terrarium is a thoughtful, handmade gift that conveys effort, creativity, and natural beauty.
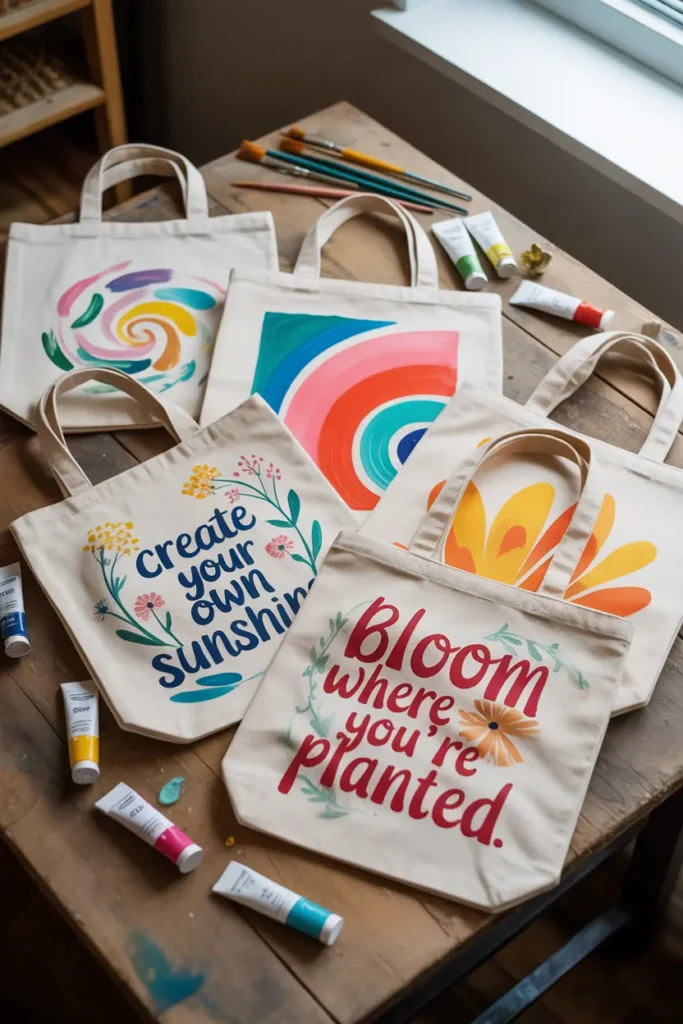
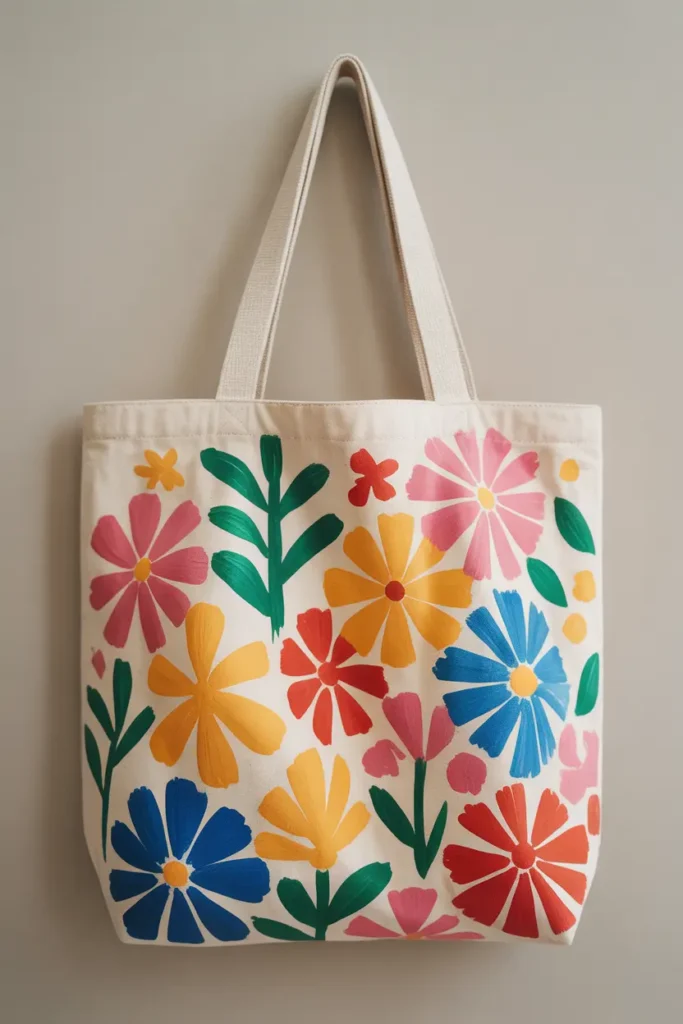
8. Custom Tote Bags
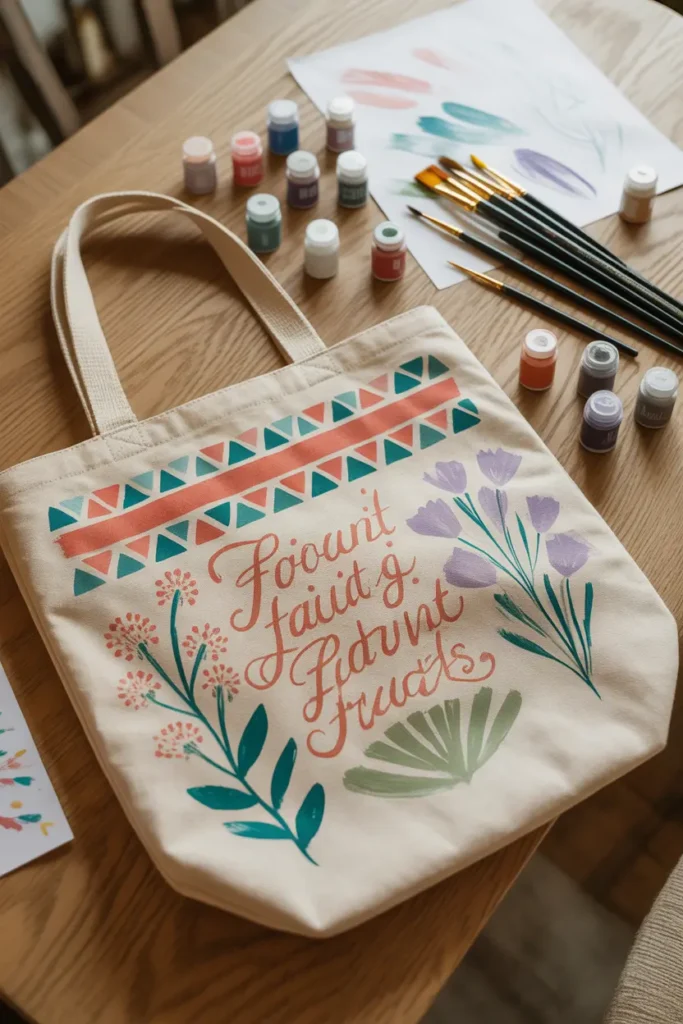
Materials Needed:
- Plain canvas tote bag
- Fabric paints or markers
- Paintbrushes or sponges
- Stencils (optional)
- Painter’s tape (optional)
Steps:
- Plan your design on paper or lightly sketch on the bag.
- Use fabric paints or markers to transfer design onto the tote.
- Let paint dry completely.
- Heat set paint if required by product instructions.
- Optional: add stencils or tape for clean edges and patterns.
Custom tote bags are a practical yet highly creative DIY gift idea. They allow for personalization through quotes, patterns, or colorful designs that reflect the recipient’s personality. Beginners can start with simple shapes or stenciled letters and gradually experiment with intricate designs. Canvas bags are durable, eco-friendly, and reusable, making them both a stylish and functional gift. The DIY process ensures that each bag is unique, giving a personal touch that store-bought gifts often lack.
You can also create themed sets, such as matching pouches or accessories, for a more complete gift package. Fabric paints and markers provide vibrant, long-lasting designs that can withstand daily use. Personalized tote bags are perfect for students, travelers, or anyone who appreciates handmade items. They’re lightweight, easy to ship, and ideal for birthdays, holidays, or casual gift-giving. This DIY project combines creativity, function, and thoughtful design, resulting in a gift that’s both beautiful and useful.
9. Handmade Lip Balm
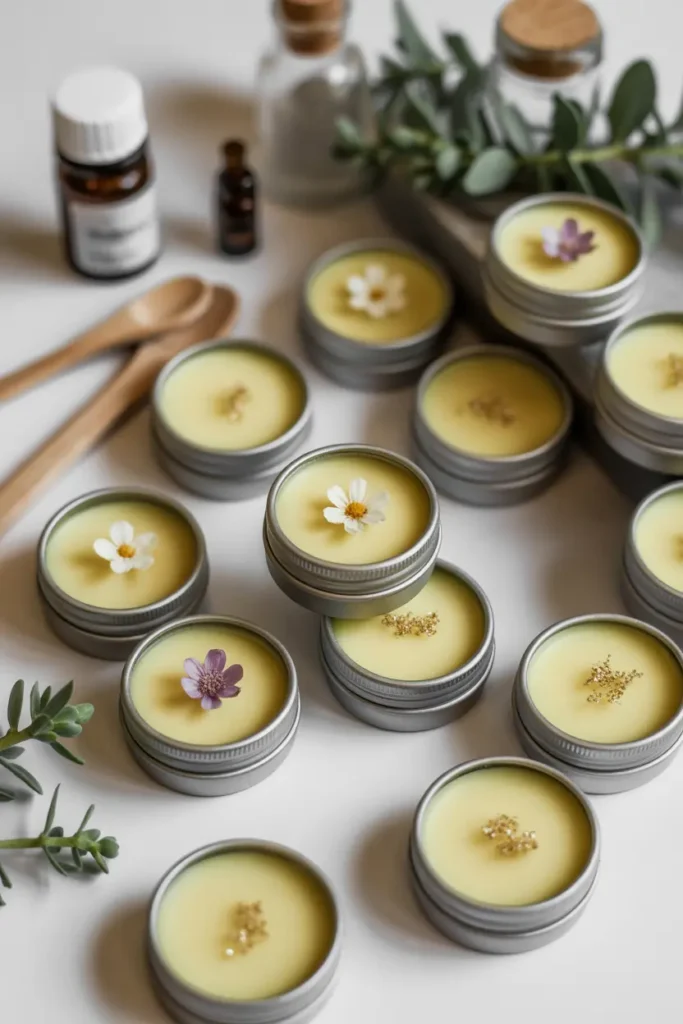
Materials Needed:
- Beeswax or soy wax
- Coconut oil or shea butter
- Essential oils (flavor/scent)
- Small tins or containers
- Double boiler or microwave-safe bowl
- Stirring utensil
Steps:
- Melt beeswax and coconut oil together.
- Remove from heat and add essential oils.
- Pour mixture into small tins or containers.
- Let cool and solidify completely.
- Seal containers and decorate labels if desired.
Handmade lip balm is a simple yet thoughtful DIY gift perfect for all ages. It combines practicality with personalization, allowing you to create scented or flavored variations. Beginners can enjoy the straightforward melt-and-pour process, producing professional-looking results. Using natural ingredients like beeswax and coconut oil provides moisturizing benefits while keeping the product safe and gentle. These small, customizable gifts are perfect for stocking stuffers, party favors, or wellness gift sets.
You can also experiment with colors, shimmer, or layered effects to make the lip balm visually appealing. Pairing the balm with a small handmade pouch or spa set elevates the gift. The compact size makes it travel-friendly and easy to gift individually or in multiples. Whether for birthdays, holidays, or casual gift-giving, handmade lip balm is a versatile, beginner-friendly DIY project that adds a personal touch to any occasion.
10. Painted Wooden Key Holders
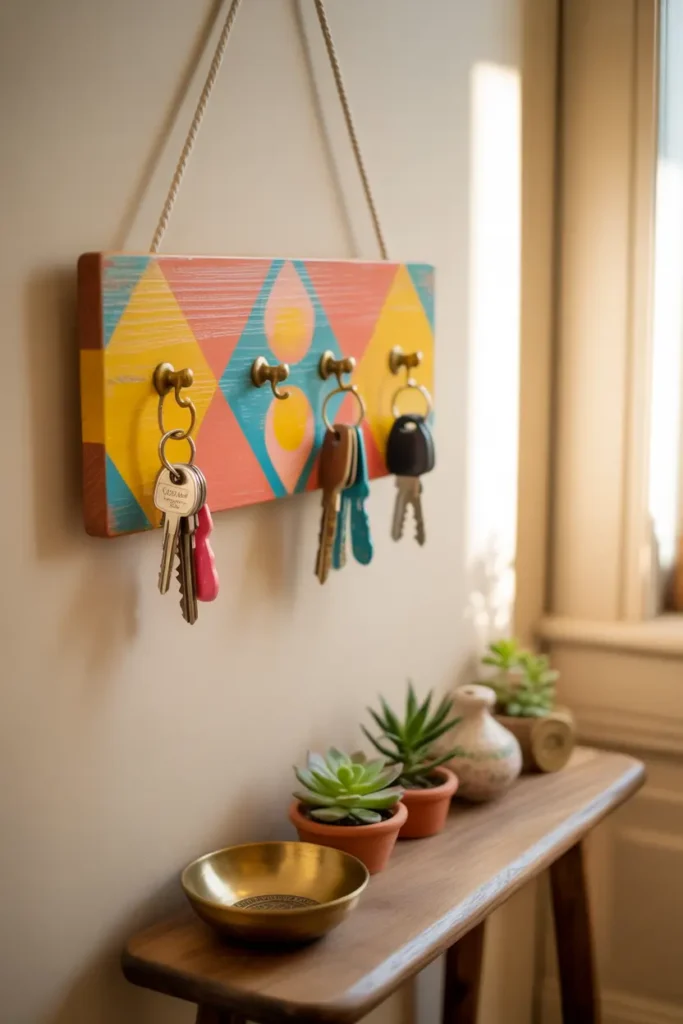
Materials Needed:
- Small wooden board
- Acrylic paints
- Paintbrushes
- Small hooks or knobs
- Screws and screwdriver
- Sandpaper
Steps:
- Sand the wooden board for a smooth surface.
- Paint desired design and let dry completely.
- Attach hooks or knobs to the board.
- Mount the board on the wall securely.
- Optional: seal with clear varnish for durability.
Painted wooden key holders are a creative DIY gift that combines practicality with personalized design. Beginners can explore color blocking, patterns, or lettering to create visually appealing functional decor. The addition of hooks makes it a useful item for any home, while painting adds charm and individuality. It’s perfect for gifting to friends, family, or new homeowners, offering both style and utility in one handmade package.
You can customize these key holders with names, quotes, or motifs that suit the recipient’s personality. They’re also great for small spaces like apartments or entryways, helping keep essentials organized while enhancing décor. Painted wooden key holders are beginner-friendly, affordable, and versatile. They provide an opportunity to practice DIY painting skills while producing a finished product that is practical, visually striking, and deeply personal—perfect for gifting on any occasion.
11. Custom Photo Coasters
Materials Needed:
- Plain coasters (ceramic, cork, or wood)
- Printed photos or designs
- Mod Podge or clear-drying glue
- Foam brush
- Scissors
- Clear sealant spray
Steps:
- Cut photos/designs to match coaster size.
- Apply a thin layer of Mod Podge to coaster surface.
- Place photo and smooth out air bubbles.
- Coat top with additional Mod Podge for sealing.
- Let dry completely, then spray with clear sealant for durability.
Custom photo coasters are both practical and sentimental, making them a top DIY gift choice. Beginners can easily adapt this project by using printed photos, scrapbook papers, or decorative designs. Each coaster is unique, providing a personal touch that store-bought items often lack. These coasters are perfect for coffee tables, living rooms, or kitchens, allowing loved ones to enjoy memories daily.
You can mix and match photo styles, patterns, or seasonal themes for multiple sets, making them versatile gifts for birthdays, holidays, or housewarmings. Adding a clear sealant ensures the coasters remain water-resistant and long-lasting. With minimal materials and a simple process, these personalized coasters allow beginners to create a beautiful, functional gift that is deeply meaningful and visually appealing.
12. Hand-Poured Soy Candles
Materials Needed:
- Soy wax flakes
- Candle wicks
- Glass jars or tins
- Essential oils (optional)
- Double boiler or microwave-safe bowl
- Stirring utensil
Steps:
- Melt soy wax using a double boiler.
- Attach wick to jar bottom and secure.
- Add essential oils to melted wax if desired.
- Pour wax into jar around the wick.
- Allow to cool completely before trimming wick.
Hand-poured soy candles are beginner-friendly, eco-conscious gifts that combine aesthetics and relaxation. They allow for endless customization through scents, colors, and decorative toppings like dried flowers, making each candle unique. Soy wax burns cleanly and slowly, offering a longer-lasting experience compared to traditional paraffin candles. Beginners can experiment with layering or ombre effects, creating visually stunning candles that are also functional.
These candles are perfect for birthdays, holidays, or self-care gift sets. Adding a personalized label or decorative ribbon elevates the presentation, giving a professional, handmade feel. The process encourages creativity while producing a finished product that enhances any home with warmth, scent, and charm. DIY soy candles are versatile, practical, and offer the satisfaction of gifting something crafted with care.
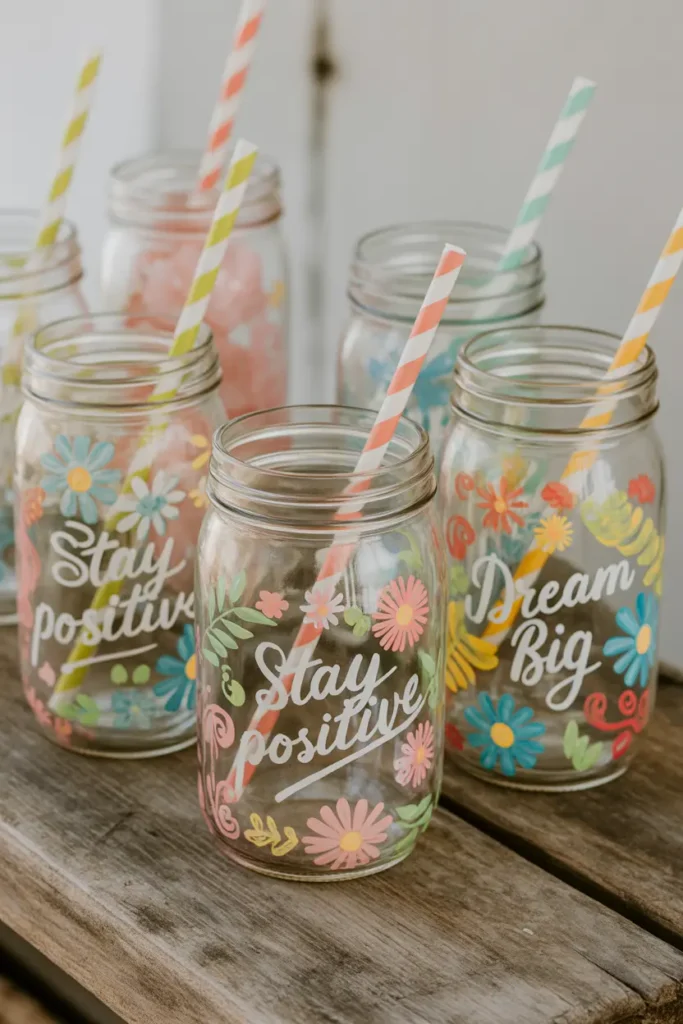
13. Personalized Mason Jar Tumblers
Materials Needed:
- Mason jars with lids
- Acrylic paints or paint pens
- Brushes or sponges
- Painter’s tape (optional for designs)
- Sealer spray (optional)
Steps:
- Clean mason jar and remove any labels.
- Sketch design lightly with pencil if desired.
- Paint or draw designs using acrylics or paint pens.
- Allow paint to dry completely.
- Seal with clear spray if using daily for drinks.
Personalized mason jar tumblers are a fun and creative DIY gift that merges practicality with aesthetics. You can add names, quotes, or small illustrations to match the recipient’s personality. Beginners enjoy the flexibility of painting freehand or using stencils for clean designs. These jars are ideal for smoothies, iced tea, or infused water, adding a touch of creativity to everyday hydration.
Custom mason jars are perfect for gifting on birthdays, teacher appreciation days, or as party favors. The combination of hand-painted artistry and usable functionality makes these gifts both meaningful and practical. Using bright colors or seasonal themes can make them especially unique. The DIY approach ensures each tumbler is one-of-a-kind, reflecting effort and care, making them cherished by recipients while enhancing their daily routines.
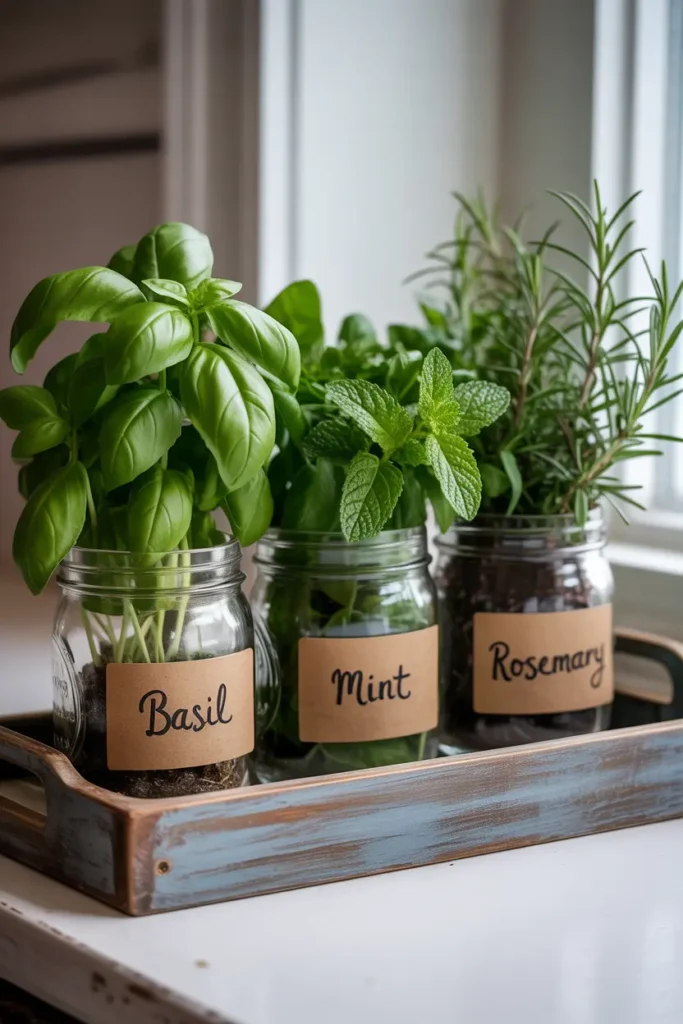
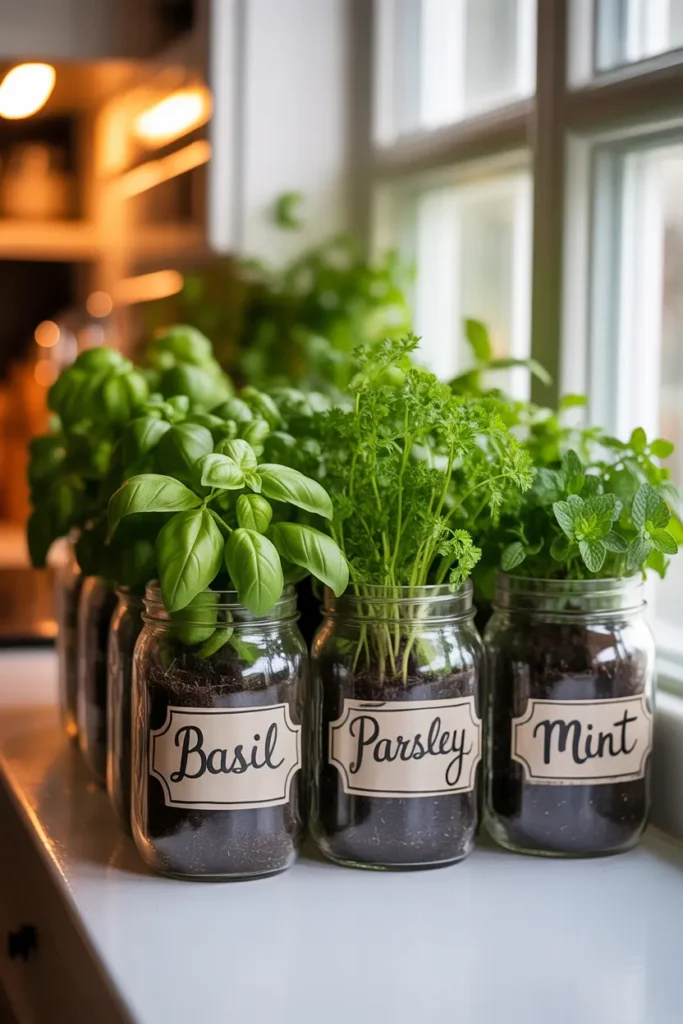
14. Personalized Mini Herb Garden Kit
Materials Needed:
- Small mason jars or pots
- Potting soil
- Herb seeds (basil, mint, rosemary, etc.)
- Wooden tray
- Chalkboard or paper labels
- Markers
Steps:
- Fill each jar with potting soil.
- Plant seeds according to package instructions.
- Label each jar with herb name using chalkboard/paper labels.
- Arrange jars neatly on a wooden tray.
- Wrap with a ribbon or small gift bag if desired.
A mini herb garden is a thoughtful and practical gift that keeps giving. Not only does it brighten up kitchens and windowsills, but it also provides fresh herbs for cooking. This DIY project is beginner-friendly and allows for personalization with custom labels or decorated jars. You can mix and match herbs based on preference, creating a tailored gift that shows effort and care. It’s perfect for friends, family, or anyone who enjoys cooking or gardening.
This gift combines greenery and functionality, making it suitable for small spaces or apartments. The jars can be reused or recycled, adding an eco-friendly touch. Personalizing with labels, painted jars, or decorative trays adds a creative flair, making the gift both stylish and useful. It’s a fun weekend project that’s easy to assemble and impresses recipients with its charm and practicality. A personalized mini herb garden kit is a unique alternative to typical store-bought gifts, blending thoughtfulness, creativity, and usefulness in one package.
15. Painted Ceramic Planters
Materials Needed:
- Plain ceramic pots
- Acrylic paints or paint pens
- Paintbrushes
- Painter’s tape (optional for geometric designs)
- Clear sealant spray
Steps:
- Clean and dry ceramic planter.
- Sketch design or use painter’s tape for patterns.
- Paint desired design and allow to dry.
- Apply clear sealant for durability.
- Plant succulents or small greenery inside.
Painted ceramic planters are a versatile DIY gift that adds a pop of color and creativity to any space. Beginners can start with simple geometric patterns, stripes, or abstract designs, gradually experimenting with more intricate looks. These planters are perfect for small succulents, cacti, or herbs, allowing the recipient to enjoy greenery alongside artistic decoration. The combination of hand-painted design and functional gardening makes them a meaningful and beautiful gift.
Customizing colors and patterns allows for personalization to suit the recipient’s style or home décor. Multiple planters can be grouped to create a mini indoor garden, making a more elaborate gift set. Using a sealant ensures long-lasting vibrancy and protection against water. This DIY project combines creativity, functionality, and care, producing an attractive, handmade gift that enhances living spaces while showcasing the maker’s personal touch.
16. Personalized Recipe Book
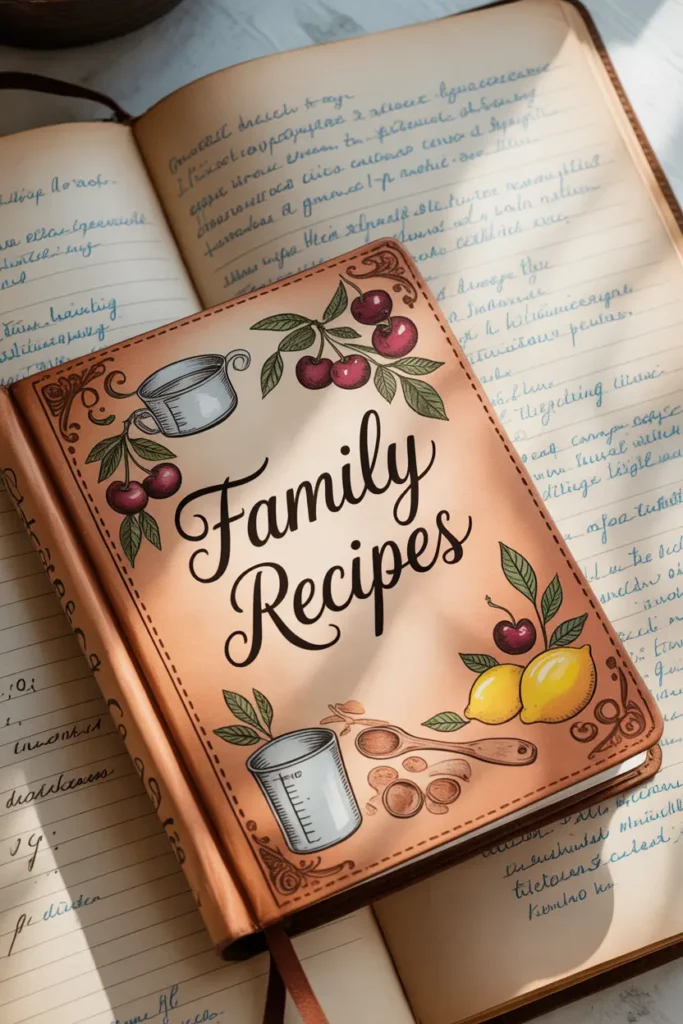
Materials Needed:
- Blank notebook or journal
- Pens, markers, or paint pens
- Stickers or decorative paper
- Glue or double-sided tape
- Printed family recipes (optional)
Steps:
- Decorate the cover with personalized art or lettering.
- Organize recipes into categories (breakfast, lunch, dinner, desserts).
- Handwrite or paste printed recipes onto pages.
- Add small decorative elements like stickers or sketches.
- Optional: Tie a ribbon or add a bookmark for finishing touch.
A personalized recipe book is a thoughtful gift that blends creativity with sentimental value. Beginners can create it easily using a blank notebook, decorating it with hand lettering, doodles, or pasted images. It’s perfect for capturing family favorites, kitchen experiments, or themed recipes. The effort shows care and adds a personal touch that cannot be bought, making it a heartfelt gift for parents, friends, or food-loving partners.
Customizing sections and decorations allows the book to reflect the recipient’s personality or cooking style. You can also include small notes, tips, or anecdotes beside recipes to enhance its charm. With minimal materials, this DIY project transforms a simple notebook into a treasured keepsake. It’s functional, creative, and meaningful, making it a gift that’s both practical and emotionally valuable.
17. Handmade Jewelry Dish
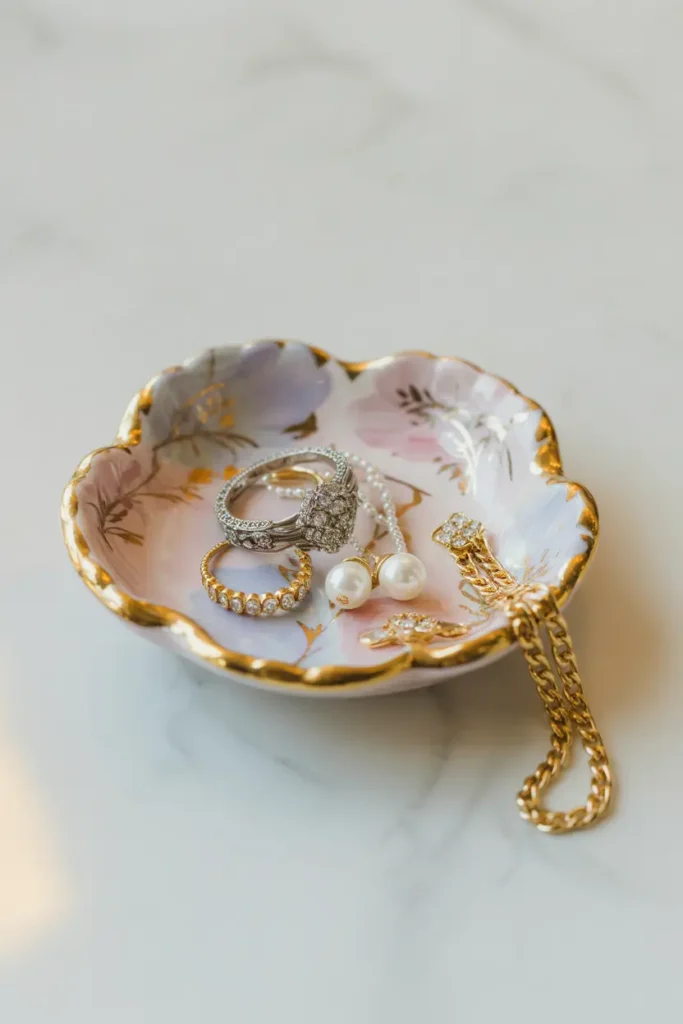
Materials Needed:
- Air-dry clay or small ceramic dish
- Acrylic paints or paint pens
- Paintbrushes
- Sealer or varnish
- Optional: gold leaf or decorative accents
Steps:
- Shape clay into a small dish and let dry completely.
- Paint patterns, flowers, or initials onto the dish.
- Add gold leaf or metallic accents if desired.
- Seal with a clear varnish to protect the paint.
- Let fully dry before using for jewelry storage.
Handmade jewelry dishes are a stylish and practical DIY gift. They combine artistry and functionality, giving the recipient a dedicated place to store rings, earrings, and small trinkets. Beginners can create charming designs using clay or paint on pre-made ceramic dishes. This project is approachable and allows for endless personalization through colors, patterns, or metallic accents, creating a unique and beautiful keepsake.
Customizing each dish with initials, patterns, or seasonal colors makes it extra special for birthdays, holidays, or bridal gifts. The small size makes it perfect for desk decor, bedside tables, or bathroom counters. Adding a protective sealer ensures durability while maintaining the hand-crafted look. This DIY project is simple, creative, and results in a charming gift that’s both functional and decorative, making it suitable for anyone who appreciates thoughtful, handmade items.
18. Decorative Scented Sachets
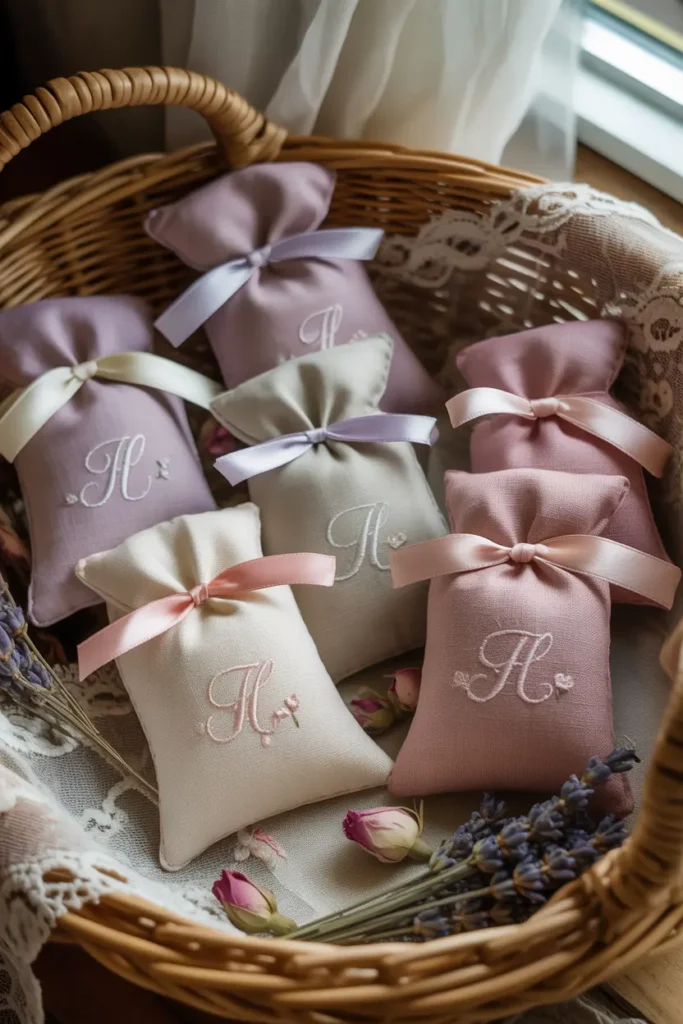
Materials Needed:
- Small fabric squares or pre-made mini bags
- Dried flowers or herbs (lavender, rose petals)
- Essential oils
- Needle and thread or sewing machine
- Ribbon for finishing
Steps:
- Place dried flowers/herbs and a few drops of essential oil in fabric square.
- Fold and sew closed into a small pouch.
- Add ribbon for decoration.
- Optional: Add hand-stitched initials or motifs.
- Use individually or gift in a decorative basket.
Decorative scented sachets are a charming DIY gift that combines fragrance with hand-crafted design. Beginners can easily create these using dried flowers, herbs, or essential oils in small fabric bags. They are ideal for adding a fresh, calming aroma to closets, drawers, or bedrooms while serving as thoughtful presents. The sachets can be personalized with monograms, embroidery, or themed decorations, making each one unique and meaningful.
Scented sachets are versatile and affordable, perfect for gifting individually or as part of a gift basket. Experiment with seasonal scents, such as cinnamon for winter or lavender for summer, to enhance appeal. The hand-sewn and aromatic nature of these sachets makes them a memorable, sensory gift. This DIY project is simple, beginner-friendly, and yields charming results that delight both the eyes and senses of the recipient.
19. Hand-Painted Tote Bags
Materials Needed:
- Plain canvas tote bags
- Acrylic fabric paints
- Paintbrushes or sponge brushes
- Painter’s tape (optional for patterns)
- Cardboard (to insert inside bag for stability)
Steps:
- Insert cardboard inside the tote to prevent paint bleed-through.
- Sketch design or pattern lightly with pencil.
- Paint design using fabric acrylic paints.
- Allow to dry completely.
- Optional: Seal with fabric medium or heat set according to paint instructions.
Hand-painted tote bags are functional and fashionable DIY gifts that allow for endless creativity. Beginners can start with simple designs like abstract patterns, floral motifs, or motivational quotes. Canvas tote bags provide a large surface for artistic expression while remaining practical for daily use. Personalized bags are perfect for eco-conscious recipients, making them thoughtful, unique, and reusable presents.
Adding custom colors, patterns, or initials allows you to tailor the tote to the recipient’s personality or style. These DIY totes are ideal for birthdays, teacher gifts, or casual gift exchanges. The combination of handmade artistry and utility makes them appealing, while fabric paints ensure lasting, washable designs. This project is beginner-friendly, creative, and results in a stylish accessory that doubles as a heartfelt gift.
20. Mason Jar Herb Garden
Materials Needed:
- Mason jars
- Potting soil
- Herb seeds or small plants
- Acrylic paint or labels for decoration
- Small pebbles for drainage
Steps:
- Decorate jars with labels or paint.
- Add a layer of pebbles for drainage.
- Fill jars with potting soil.
- Plant herb seeds or seedlings.
- Place in sunlight and water as needed.
A DIY mason jar herb garden is both practical and decorative, making it a perfect gift for plant lovers or aspiring cooks. Beginners can easily create a small indoor garden with minimal materials. Labeling each jar adds a personal touch, making it organized and visually appealing. Fresh herbs like basil, parsley, or mint enhance cooking while bringing greenery into any space.
These small herb gardens are compact, beginner-friendly, and ideal for kitchens, balconies, or windowsills. Mason jars allow portability and versatility, while painted labels or decorative touches make them visually attractive. This DIY gift combines functionality, creativity, and thoughtfulness, providing a present that keeps on giving. It’s perfect for birthdays, housewarming gifts, or as part of a self-care themed package.
21. Hand-Painted Reusable Tote Bag
Materials Needed:
- Plain canvas tote bag
- Fabric paints or markers
- Paintbrushes
- Stencils (optional)
- Palette or mixing tray
Steps:
- Pre-wash and iron the canvas bag.
- Sketch your design lightly with pencil (optional).
- Paint or draw your patterns using fabric paints/markers.
- Let it dry completely according to paint instructions.
- Heat-set if needed and gift-wrap.
A hand-painted tote bag is a stylish, eco-conscious gift that shows thoughtfulness and creativity. By customizing colors, patterns, or even adding a name or quote, it becomes a one-of-a-kind present. Beginners can use stencils or simple motifs, while advanced crafters can experiment with intricate designs. This gift is practical for daily use and sustainable, reducing reliance on store-bought bags. It’s perfect for friends, family, or coworkers who appreciate handmade and personalized items.
What makes this gift extra special is its combination of artistry and utility. It’s functional for grocery runs, books, or beach trips while doubling as a wearable piece of art. The bag can be easily washed and reused, offering long-lasting charm. Add a ribbon, tag, or small sachet of dried flowers inside for an extra touch. A hand-painted tote is a creative DIY gift that’s fun to make, practical to use, and guaranteed to impress recipients with your effort and artistic flair.
22. Handmade Scented Candles
Materials Needed:
- Soy or beeswax
- Candle wicks
- Glass jars or containers
- Essential oils or fragrance oils
- Optional: dried flowers, colorants
Steps:
- Melt wax according to instructions.
- Secure wick in center of jar.
- Add fragrance or essential oils to melted wax.
- Pour wax into jars and let set.
- Decorate tops with dried flowers or colored layers.
Handmade scented candles are an elegant, cozy DIY gift suitable for any occasion. Beginners can create simple jar candles with soothing scents or experiment with layered colors and decorative elements. The process allows personalization to match the recipient’s favorite fragrances or home decor style. Candles provide both visual and aromatic appeal, making them thoughtful, relaxing, and beautiful gifts that are appreciated by all.
Adding dried flowers, herbs, or layered colors elevates the aesthetic appeal of these candles. They make ideal presents for birthdays, holidays, or housewarming events. The melt-and-pour method simplifies the process for beginners while producing professional-looking results. Handmade scented candles are not only charming but also functional, allowing the recipient to enjoy warmth, fragrance, and ambiance, creating a truly memorable and heartfelt DIY gift.
23. Custom Photo Memory Jar
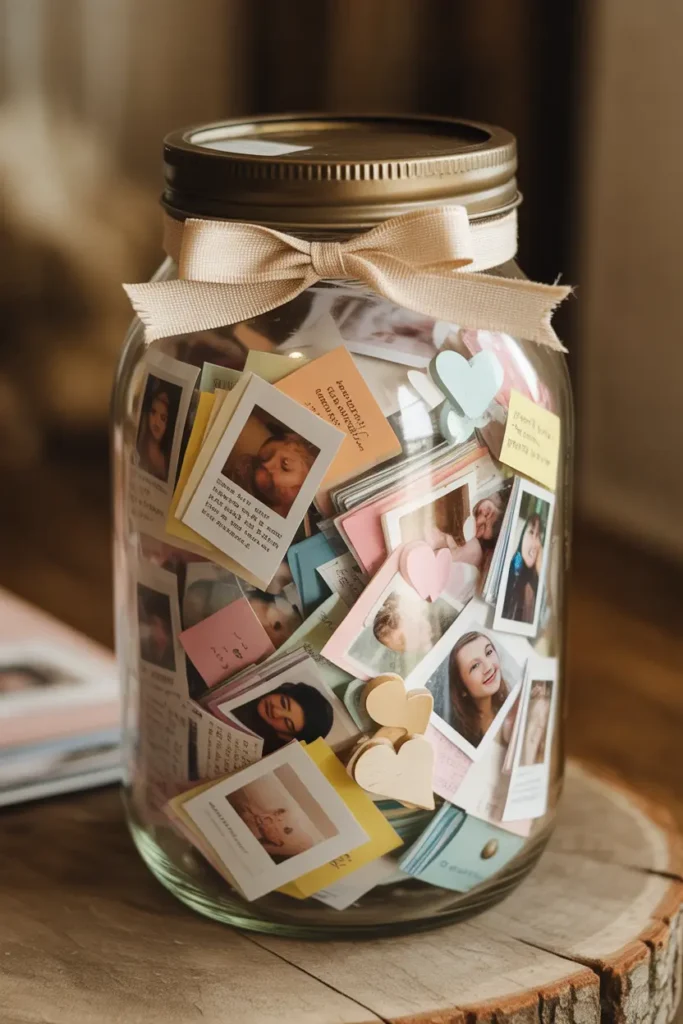
Materials Needed:
- Clear mason jar or glass container
- Printed photos or mini Polaroids
- Small notes or messages
- Decorative trinkets (buttons, beads, confetti)
- Ribbon, twine, or washi tape
Steps:
- Print and cut photos to fit the jar.
- Write messages or memories on small notes.
- Layer photos, notes, and trinkets inside the jar.
- Seal with lid and decorate with ribbon or twine.
- Add a small tag with the recipient’s name or occasion.
A custom photo memory jar is a sentimental and creative gift that celebrates shared experiences. Each layer of photos, notes, and trinkets tells a story, making the recipient feel cherished. This DIY project is beginner-friendly, allowing you to personalize the jar fully with favorite memories, quotes, or tiny keepsakes. It’s a versatile idea suitable for friends, family, or romantic partners, offering a tangible way to relive happy moments and meaningful times.
The beauty of a memory jar lies in its emotional impact and adaptability. You can theme it for birthdays, anniversaries, graduations, or just “thinking of you” moments. Adding decorative elements like glitter, beads, or washi tape enhances the aesthetic and makes it visually appealing for display. It’s a heartfelt, hands-on gift that recipients can treasure forever, revisiting memories whenever they like. This creative DIY gift blends thoughtfulness, personal touch, and style into a charming keepsake that’s both beautiful and meaningful.
24. Hand-Stitched Fabric Pouches

Materials Needed:
- Fabric squares
- Needle and thread or sewing machine
- Drawstring cord or ribbon
- Scissors
- Optional: beads, embroidery floss
Steps:
- Cut fabric to desired size.
- Fold and sew edges, leaving an opening at the top.
- Insert drawstring cord and secure ends.
- Optional: Add embroidery or decorative accents.
- Fill pouch with trinkets, small gifts, or dried flowers.
Hand-stitched fabric pouches are charming DIY gifts that are both functional and decorative. They are easy for beginners to make and can be customized with patterns, colors, or embroidery. Perfect for storing jewelry, cosmetics, or small keepsakes, these pouches add a personal, handmade touch to gift-giving. Their compact size makes them versatile and convenient for all ages.
Adding embroidery, beads, or patterned fabrics makes each pouch unique. These handmade items are perfect for weddings, birthdays, or holiday gifts. They offer a simple yet thoughtful way to package small presents while demonstrating creativity and care. DIY fabric pouches are beginner-friendly, practical, and visually appealing, ensuring that your gift is cherished and remembered for its craftsmanship and utility.
25. Decorative Memory Jar
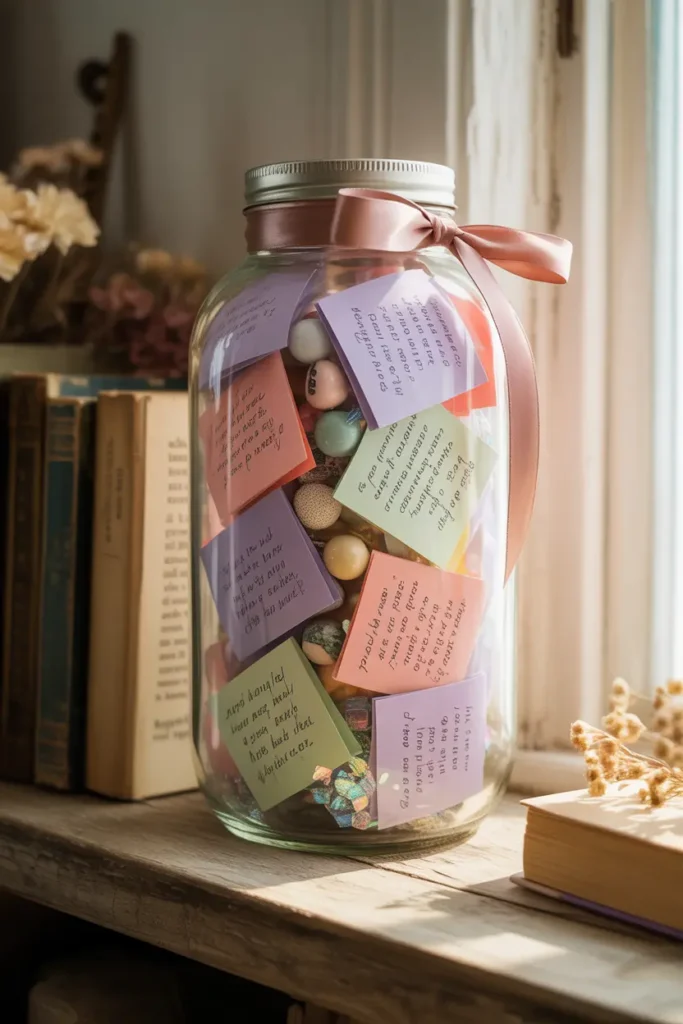
Materials Needed:
- Glass jar or mason jar
- Colorful paper or cardstock
- Pens or markers
- Decorative ribbons or stickers
- Small trinkets or confetti
Steps:
- Cut paper into small note-sized pieces.
- Write memories, quotes, or wishes on each piece.
- Fold and place notes into the jar.
- Add decorative confetti or small trinkets.
- Seal with a lid and decorate with ribbons.
A decorative memory jar is a heartfelt DIY gift that captures cherished moments, wishes, or inspiration. Beginners can create it with simple materials like paper, pens, and a glass jar. Each note inside provides a personal touch that makes the gift memorable and emotional. It’s ideal for family members, close friends, or partners, offering a unique way to celebrate memories and milestones.
Customizing the jar with colorful notes, themed decorations, or hand-painted designs adds charm and personality. The recipient can revisit the jar anytime for a nostalgic or uplifting experience. This DIY project is simple, thoughtful, and creative, combining sentimentality with aesthetic appeal. A decorative memory jar stands out as a unique and meaningful present that reflects care, creativity, and emotional connection.
Conclusion
Handmade gifts have a special charm that store-bought items can’t match. These 25 DIY projects combine creativity, practicality, and heartfelt sentiment, making them perfect for any occasion. Whether you’re crafting for a loved one or experimenting with new ideas, these beginner-friendly gifts are fun, unique, and memorable. Give your presents a personal touch, showcase your creativity, and enjoy the joy of gifting something made with love. Handmade gifts truly make every occasion extra special.