21 DIY Wreath Ideas to Decorate Every Season
Wreaths are a timeless way to celebrate the seasons, holidays, or simply add a decorative touch to any space. With a few simple materials, you can craft stunning DIY wreaths that reflect your personal style, from rustic farmhouse designs to modern, colorful creations. These 21 DIY wreath ideas are perfect for beginners and experienced crafters alike. Each project offers easy-to-follow steps and creative inspiration, making it simple to enhance doors, walls, or tables with handmade, beautiful accents that brighten your home year-round.
1. Lavender & Burlap Rustic Wreath

Materials Needed:
- Grapevine wreath base
- Dried lavender stems
- Burlap ribbon
- Twine
- Hot glue gun
Steps:
- Wrap the burlap ribbon around the wreath base.
- Gather lavender stems into small bundles.
- Glue the bundles evenly around the wreath.
- Add small twine bows.
- Hang the wreath on a door or wall.
A lavender and burlap rustic wreath is the perfect blend of elegance and simplicity. It brings a soft, farmhouse-inspired look to any space, making it great for front doors, bedrooms, or cozy living rooms. Beginners love this DIY because the natural textures and muted tones create a polished result without needing advanced crafting skills. The soothing scent of dried lavender adds a calming ambiance, making this wreath both decorative and functional. Its neutral color palette blends effortlessly with seasonal décor, making it a lovely year-round option.
This wreath is ideal for anyone who loves earthy, natural décor. You can easily customize it by adding dried eucalyptus, wheat stalks, or lace accents for a more detailed look. The burlap base gives it durability and a sturdy structure while maintaining a handmade charm. It also makes a thoughtful gift for housewarmings, birthdays, or anyone who enjoys rustic decorating. With minimal materials and an easy assembly process, this lavender-inspired wreath is budget-friendly, timeless, and beautifully fragrant.
2. Seashell Coastal Wreath

Materials Needed:
- Foam wreath base
- Seashells
- Sea glass (optional)
- Hot glue gun
- Twine for hanging
Steps:
- Clean seashells and sea glass.
- Arrange shells around the wreath base.
- Glue each piece securely.
- Fill gaps with smaller shells.
- Add twine and hang.
A seashell coastal wreath brings ocean-inspired charm into your home, perfect for summer décor or beach-themed rooms. This project is fun, relaxing, and ideal for beginners because the design can be completely freeform. Each shell adds natural beauty and texture, creating a soothing, coastal aesthetic. Whether displayed in bathrooms, hallways, or beach houses, it instantly lifts the décor with seaside elegance. The wreath also serves as a great way to use shells collected during vacations, turning memories into a permanent decorative piece.
The variety of shell shapes, colors, and textures makes each wreath unique. You can personalize the design with driftwood, nautical rope, or light blue color washes for an enhanced ocean theme. This wreath works well as both wall art and door décor. It’s also a lovely handmade gift for someone who adores the beach lifestyle. With very few materials and plenty of creative freedom, the seashell coastal wreath becomes a beautiful, meaningful piece that captures the calm and charm of the seaside.
3. Floral Metal Hoop Minimalist Wreath
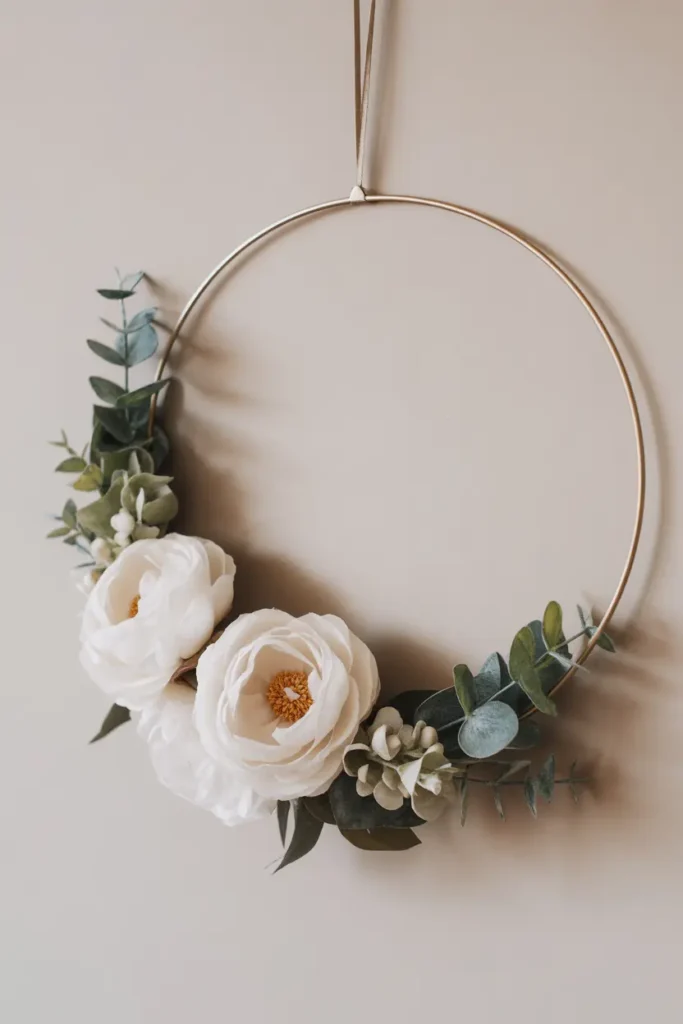
Materials Needed:
- Gold metal hoop
- Silk flowers
- Eucalyptus sprigs
- Floral wire
- Ribbon or string
Steps:
- Arrange florals on one side of the hoop.
- Secure them with floral wire.
- Add greenery for balance.
- Attach ribbon for hanging.
- Display the wreath.
A floral metal hoop minimalist wreath is perfect for anyone who loves modern, elegant décor. The open-space design creates a clean, airy look that complements contemporary interiors beautifully. Silk flowers allow for long-lasting vibrancy without wilting, making this wreath ideal for year-round use. Beginners appreciate the simple assembly and the artistic freedom to choose colors and floral combinations that match their space. Whether hung in bedrooms, offices, or entryways, this wreath adds a touch of sophistication with minimal effort.
This wreath’s lightweight and versatile design means it can be easily customized for seasons—soft pastels for spring, bright florals for summer, warm tones for fall, and muted whites for winter. Its simplicity makes it an excellent décor piece for weddings, bridal showers, or home gift sets. Adding delicate ribbons or personalized initials enhances its charm. Because of the minimalist hoop base, the wreath maintains a modern profile while still looking lush and stylish, making it a must-try DIY project.
4. Pom-Pom Rainbow Wreath
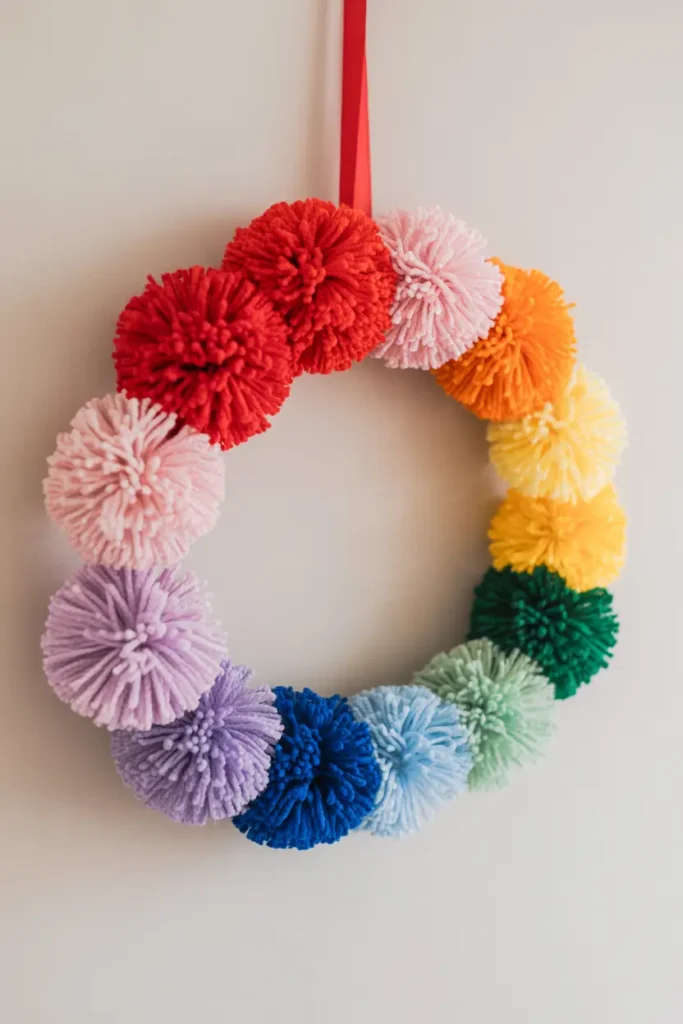
Materials Needed:
- Foam or wire wreath base
- Assorted yarn colors
- Pom-pom maker or cardboard rings
- Hot glue gun
Steps:
- Make pom-poms using yarn.
- Trim them for a uniform size.
- Glue pom-poms onto the wreath base.
- Arrange in rainbow order.
- Hang and enjoy.
A pom-pom rainbow wreath is a fun, colorful project that brightens any space. The soft yarn texture brings a cozy, playful vibe, making it especially popular for kids’ bedrooms, nurseries, or craft rooms. Beginners enjoy this DIY because pom-pom making is simple yet satisfying, and the wreath looks professionally crafted once assembled. The rainbow arrangement adds instant happiness and positivity to walls or doors. This wreath is also great for parties, birthdays, and seasonal celebrations due to its bold, cheerful appearance.
You can expand this design by adding glitter pom-poms, metallic yarn accents, or even themed colors for holidays. The wreath is lightweight and durable, making it easy to store and reuse. It also makes a thoughtful handmade gift for children, teachers, or anyone who loves colorful décor. Because pom-poms are customizable in size and texture, the wreath can be as fluffy or minimal as you want. This project beautifully blends creativity, color, and comfort, making it a joyful addition to any home.
5. Succulent Faux Greenery Wreath
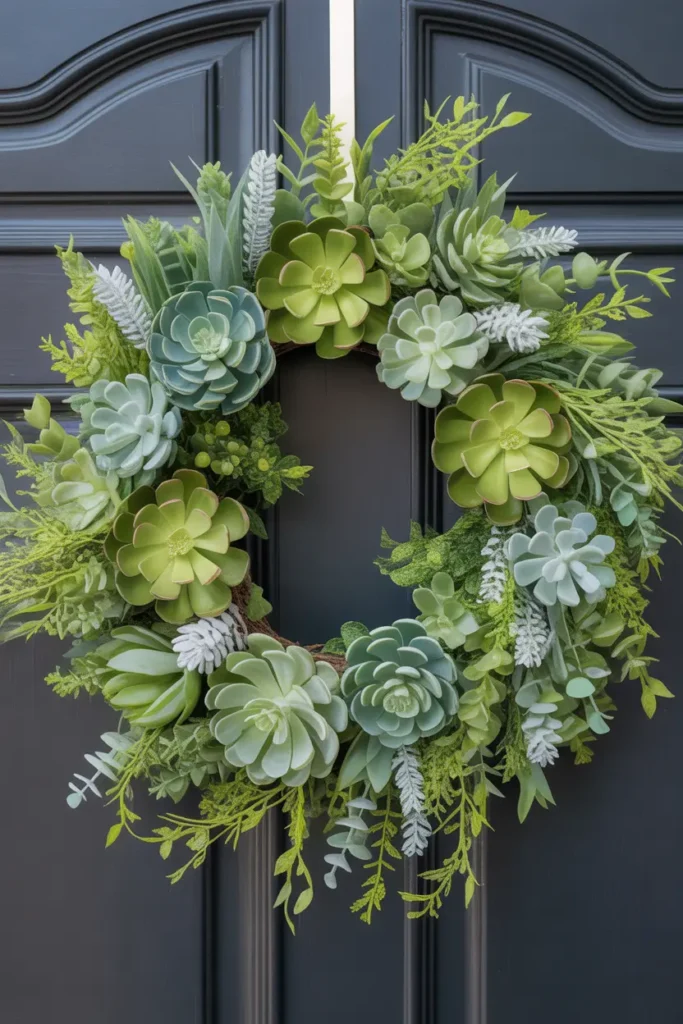
Materials Needed:
- Grapevine or foam wreath base
- Faux succulents
- Faux eucalyptus or greenery
- Floral wire
- Hot glue gun
Steps:
- Position large succulents first.
- Fill gaps with greenery and small plants.
- Secure pieces with glue or wire.
- Add trailing vines for dimension.
- Hang the wreath.
A faux succulent wreath brings a modern, vibrant look to any home décor style. The combination of thick succulents and soft greenery creates a beautiful balance of textures. This DIY is perfect for beginners because faux plants are easy to arrange and require no maintenance. The result looks fresh and lively all year long, whether used indoors or outdoors. It adds a touch of nature without the worry of watering or sunlight, making it ideal for busy homes, apartments, and office spaces.
This wreath can be customized with different succulent shapes, colors, and greenery varieties to match your personal style. You can add small wooden signs, ribbons, or name initials for extra personality. Because faux succulents are long-lasting, the wreath is durable and suitable for seasonal or long-term display. It also makes a fantastic handmade gift for plant lovers who prefer low-maintenance décor. Its stylish, garden-inspired aesthetic makes it a standout piece for front doors, kitchens, or modern living rooms.
6. Citrus Slice Summer Wreath
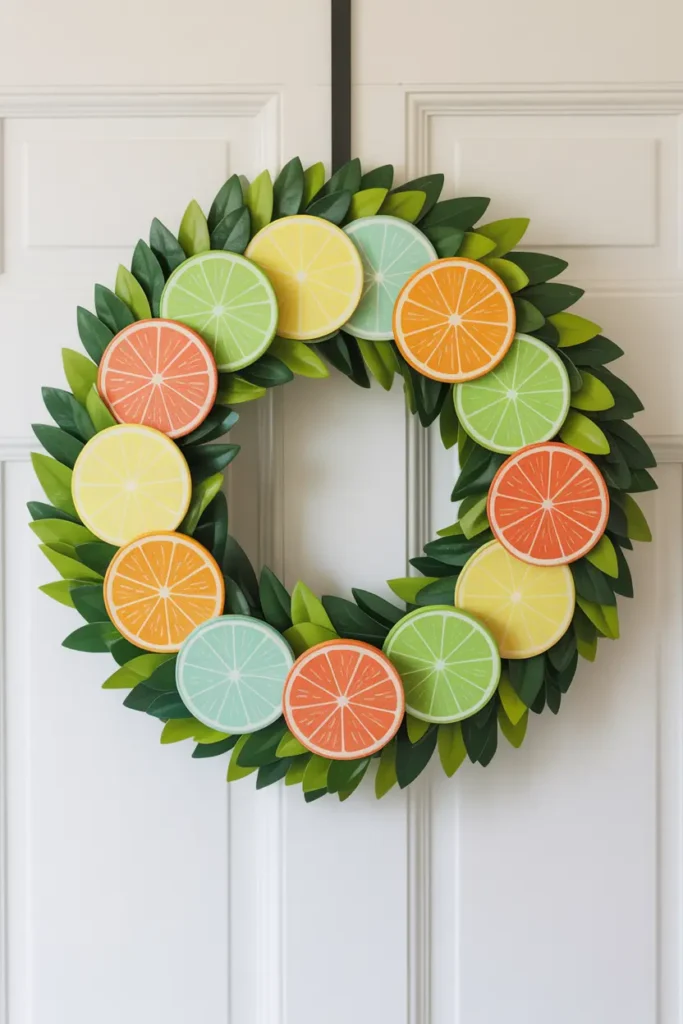
Materials Needed:
- Grapevine or foam wreath base
- Faux citrus slices
- Faux greenery
- Floral wire
- Hot glue gun
Steps:
- Cover wreath base with greenery.
- Arrange citrus slices evenly.
- Secure with hot glue.
- Add small leaf stems for fullness.
- Hang and display.
A citrus slice summer wreath adds a refreshing burst of color to any door or wall. Its bright fruit accents instantly create a warm, tropical vibe, making it ideal for summer décor. The faux slices look realistic and pair beautifully with lush greenery, giving the wreath a lively, cheerful appearance. Beginners will love how simple yet impactful this project is—arranging the slices is fun, effortless, and visually satisfying. Whether hung on patios, kitchens, or entryways, this wreath brings a lively, sunny charm to your home.
This wreath is easy to customize with additional summer elements like small white flowers, miniature lemons, or a bold ribbon bow. It’s perfect for hosting outdoor parties or adding a seasonal touch to your décor. The faux materials ensure long-lasting durability, so you can reuse it for years. Its fresh, fruity aesthetic also makes it a beautiful handmade gift for summer lovers. Lightweight, colorful, and eye-catching, a citrus slice wreath captures the bright, joyful feeling of summer in a simple DIY project.
7. Winter Snowy Pinecone Wreath

Materials Needed:
- Grapevine wreath base
- Pinecones
- Faux snow spray
- Frosted greenery
- Silver berries
Steps:
- Spray pinecones with faux snow.
- Attach them around the wreath base.
- Add frosted greenery.
- Fill gaps with silver berries.
- Hang the wreath.
A snowy pinecone wreath brings winter charm into your home with its frosted textures and cool tones. This wreath is perfect for the holiday season or as neutral winter décor. The combination of snowy pinecones and soft greenery creates a serene, festive look without being overly bold. It’s a beginner-friendly project because the natural shapes of pinecones make arranging them easy and visually balanced. Whether hung indoors or outdoors, it provides a cozy and elegant touch that celebrates the beauty of winter.
You can personalize this wreath by adding white ribbon bows, tiny ornaments, or soft LED fairy lights for a magical glow. Its durable materials ensure it lasts year after year. It’s excellent for holiday gifting, winter parties, or simply elevating home décor during the colder months. The snowy textures give it a timeless, classic winter feel that works beautifully with rustic, minimalistic, or farmhouse aesthetics. This winter wreath blends nature and elegance, making it a delightful seasonal DIY.
8. Spring Wildflower Grapevine Wreath
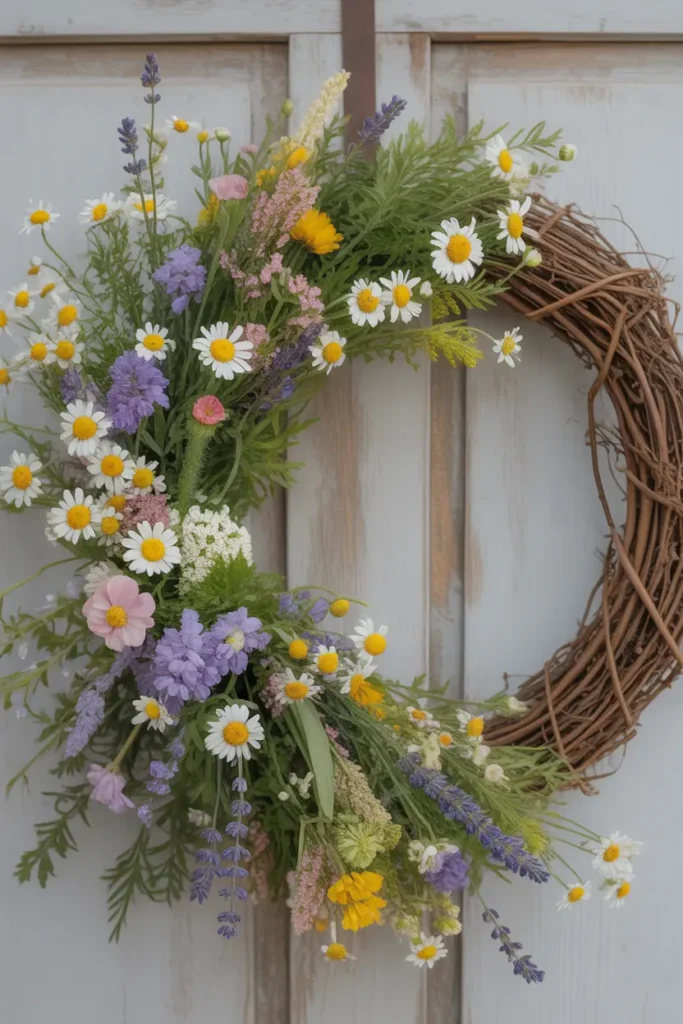
Materials Needed:
- Grapevine wreath
- Faux wildflowers
- Greenery stems
- Floral wire
- Wire cutters
Steps:
- Select a variety of wildflowers.
- Arrange them on one side or all around.
- Secure with floral wire.
- Add greenery for fullness.
- Hang the wreath.
A spring wildflower grapevine wreath celebrates the beauty of the season with its bright colors and organic arrangement. The natural shape of the grapevine base pairs perfectly with the cheerful wildflowers, creating a fresh, garden-inspired look. This wreath is ideal for spring decorating, Easter gatherings, or simply refreshing your home after winter. Beginners enjoy how flexible and forgiving this design is—wildflowers look beautiful even when arranged casually, making the project easy and rewarding.
You can customize it with butterflies, pastel ribbons, or additional greenery to enhance the seasonal theme. The wreath’s earthy, floral style makes it a versatile décor piece for entryways, bedrooms, and garden spaces. It’s also a thoughtful springtime gift, especially for nature lovers. Because wildflowers come in so many colors and styles, each wreath turns out unique and expressive. This lively, colorful DIY brings instant spring cheer to any home.
9. Elegant Pearl & Ribbon Wreath
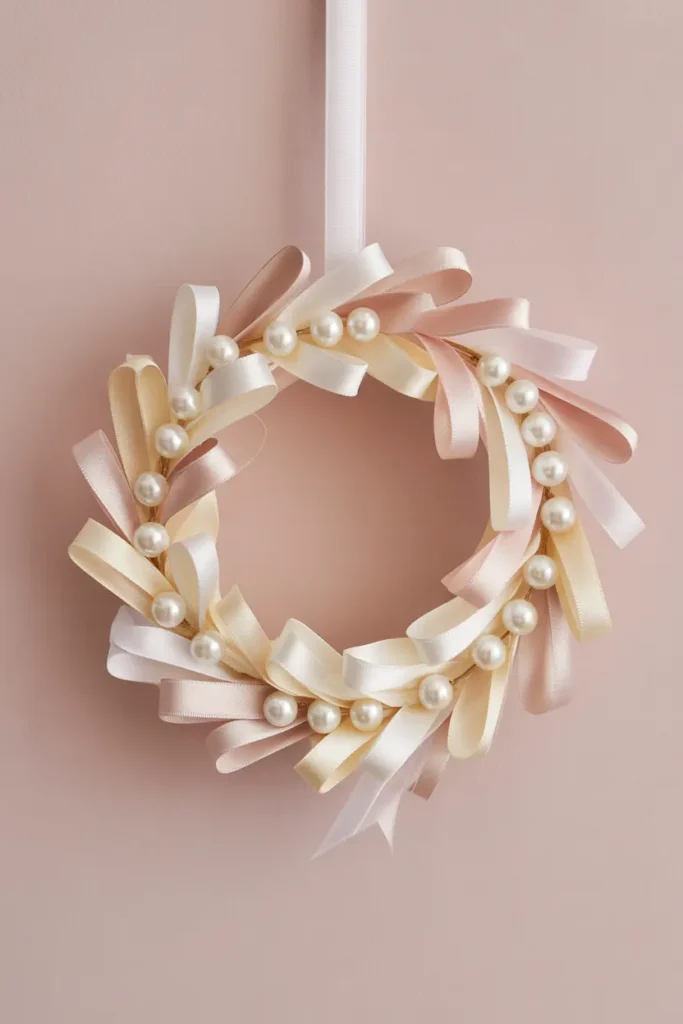
Materials Needed:
- Foam wreath base
- Satin ribbon
- Pearl beads
- Straight pins or glue
- Scissors
Steps:
- Wrap the wreath base with satin ribbon.
- Create ribbon loops and pin them in place.
- Add pearl beads throughout.
- Adjust loops for fullness.
- Hang with a ribbon.
This pearl and ribbon wreath gives off a classy, romantic vibe that’s perfect for weddings, bridal showers, or feminine home décor. The soft satin texture and elegant pearls create a polished, luxurious appearance that feels delicate without being fragile. Beginners appreciate how easy it is to shape and layer ribbon loops, allowing them to create a full, dimensional wreath with little effort. Its gentle color palette blends well with shabby chic, modern, and vintage décor styles.
You can customize the wreath with lace accents, monograms, or soft florals for added elegance. Its light weight makes it easy to hang on doors, walls, or event backdrops. This wreath also makes a gorgeous handmade gift for weddings, anniversaries, or Mother’s Day. The combination of ribbon and pearls gives it a timeless look that feels both graceful and festive. It’s a versatile and beautiful decoration that adds charm to any setting.
10. Rustic Twine & Wooden Bead Wreath
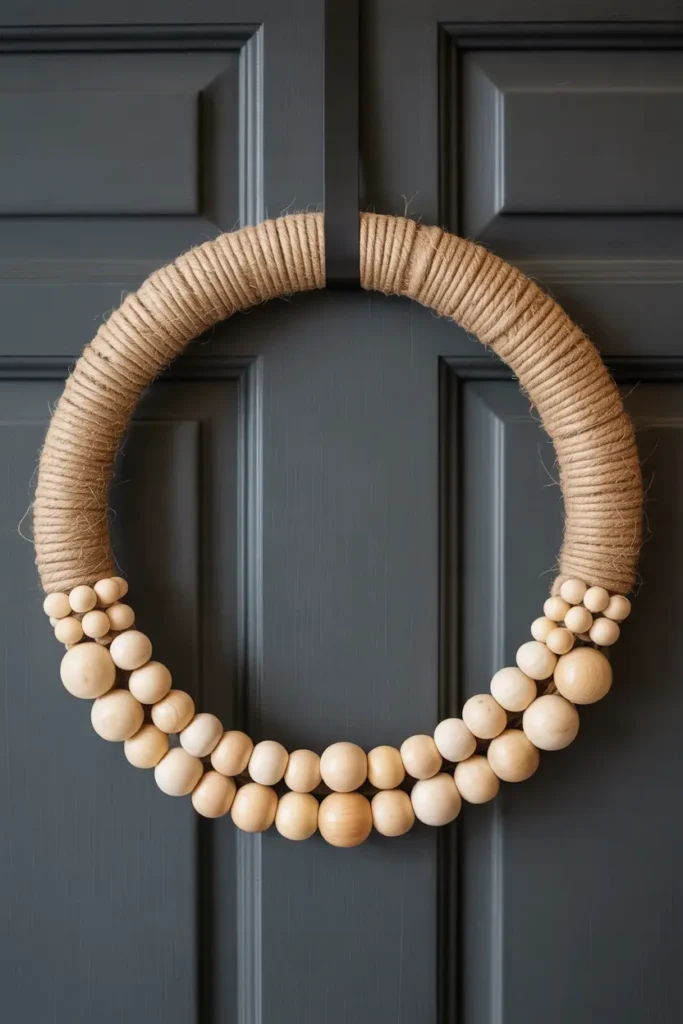
Materials Needed:
- Wire wreath base
- Twine
- Wooden beads
- Hot glue gun
- Ribbon or hook
Steps:
- Wrap twine tightly around the base.
- Glue wooden beads in clusters or patterns.
- Add a small twine or burlap bow.
- Attach ribbon for hanging.
- Display on a door or wall.
A rustic twine and wooden bead wreath is perfect for anyone who loves neutral, earthy décor. The combination of twine and smooth wooden beads creates a warm, textured look that works beautifully in modern farmhouse, Scandinavian, or boho homes. It’s a beginner-friendly project because the materials are simple and easy to arrange. The minimalist style makes it versatile for all seasons while still feeling handcrafted and cozy.
You can customize the wreath by staining the beads, adding macrame elements, or incorporating greenery. Its lightweight design makes it easy to hang anywhere in the home—from hallways to kitchen walls. This wreath also makes a thoughtful, affordable handmade gift for décor lovers. The natural materials and subtle details create a timeless aesthetic that blends effortlessly with various décor themes, making it a beautiful year-round piece.
11. Autumn Leaf Felt Wreath
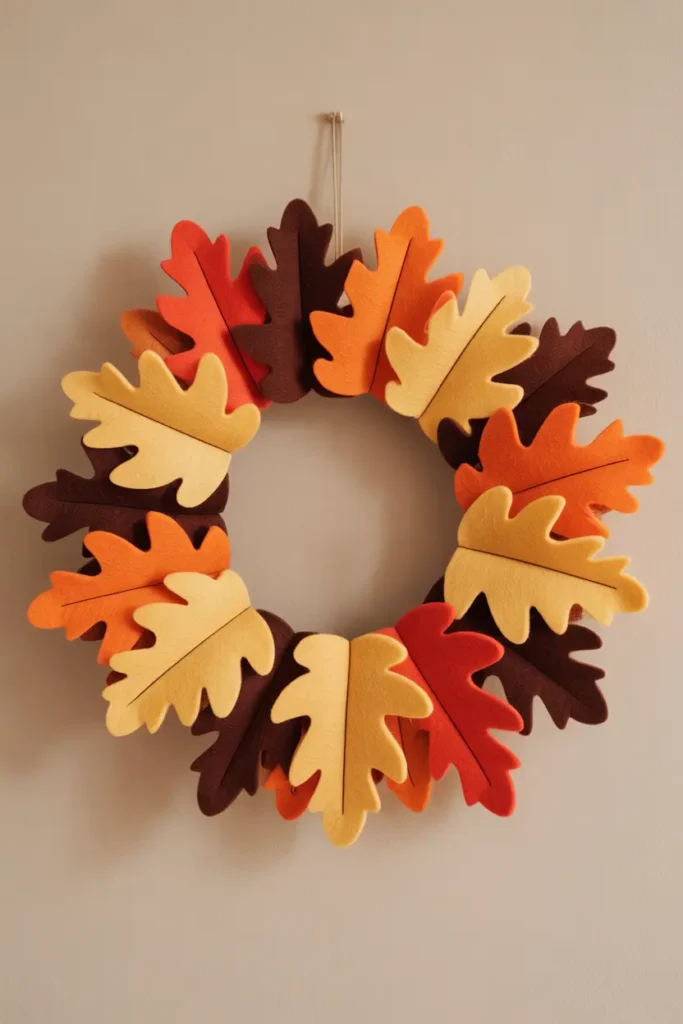
Materials Needed:
- Foam or wire wreath base
- Colored felt sheets
- Hot glue gun
- Scissors
Steps:
- Cut felt into leaf shapes.
- Layer leaves around the wreath base.
- Glue securely in place.
- Fill gaps for fullness.
- Hang the wreath.
An autumn leaf felt wreath brings the warmth and color of fall indoors. The soft texture of felt combined with vibrant fall hues creates a welcoming seasonal accent. Beginners enjoy this project because cutting and layering felt leaves is simple and forgiving, allowing creativity without precision. This wreath is perfect for entryways, living rooms, or as part of a fall décor collection. It evokes a cozy, festive atmosphere while offering a handcrafted, charming appearance that’s perfect for seasonal decorating.
You can personalize it with glitter, small acorns, or miniature pinecones for added texture. The felt material is lightweight, making it easy to hang or gift. Its cheerful fall colors also make it an ideal handmade present for friends or neighbors. The layered design ensures a rich, dimensional look while remaining beginner-friendly. Overall, this autumn leaf wreath is an inviting, easy-to-make decoration that captures the essence of fall in a creative DIY format.
12. Coffee Bean & Cinnamon Stick Wreath
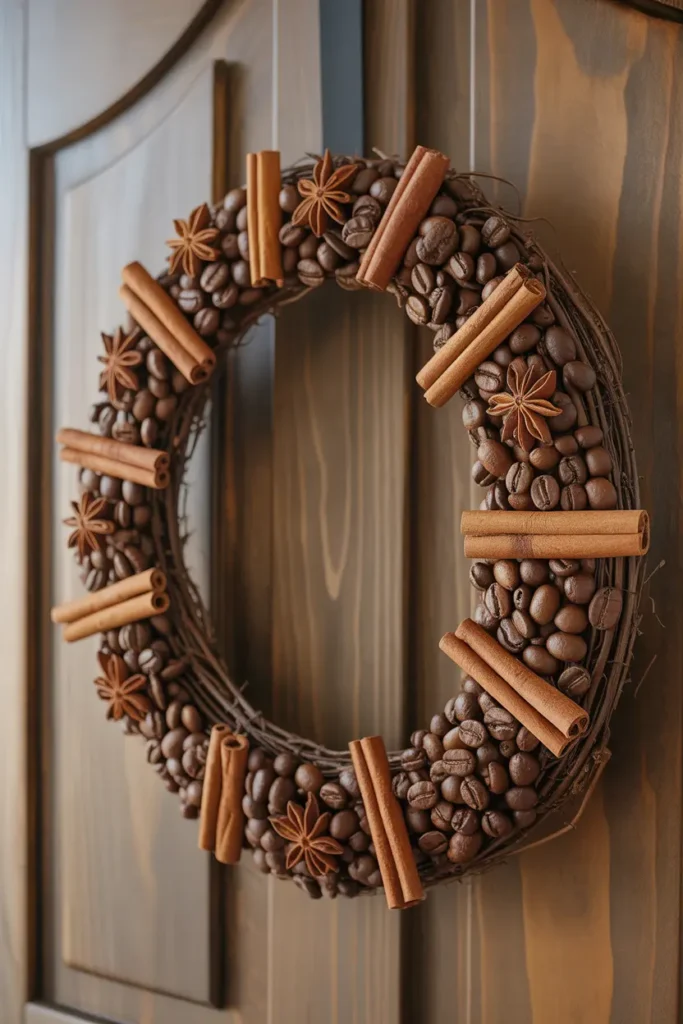
Materials Needed:
- Grapevine wreath base
- Roasted coffee beans
- Cinnamon sticks
- Hot glue gun
- Twine
Steps:
- Arrange coffee beans and cinnamon sticks around the base.
- Glue securely.
- Fill gaps with additional beans.
- Add a twine bow if desired.
- Hang the wreath.
A coffee bean and cinnamon stick wreath is perfect for bringing warmth and a cozy aroma to any home. The natural textures and rich browns create a rustic, inviting aesthetic. Beginners love this wreath because arranging beans and sticks is simple yet yields a professional-looking result. It’s ideal for kitchen walls, dining areas, or as a unique fall or winter decoration. The combination of sight and smell makes it engaging and memorable, elevating standard décor with sensory delight.
This wreath can be personalized with small dried oranges, star anise, or seasonal ribbon for extra charm. It’s a thoughtful gift for coffee lovers, housewarmings, or holiday celebrations. The natural materials ensure it’s durable and long-lasting while remaining visually appealing. Lightweight and aromatic, this wreath adds both decorative and sensory pleasure to any room. Its rustic elegance combined with simplicity makes it an accessible and satisfying DIY for crafters of all levels.
13. Mini Pom-Pom & Tassel Wreath
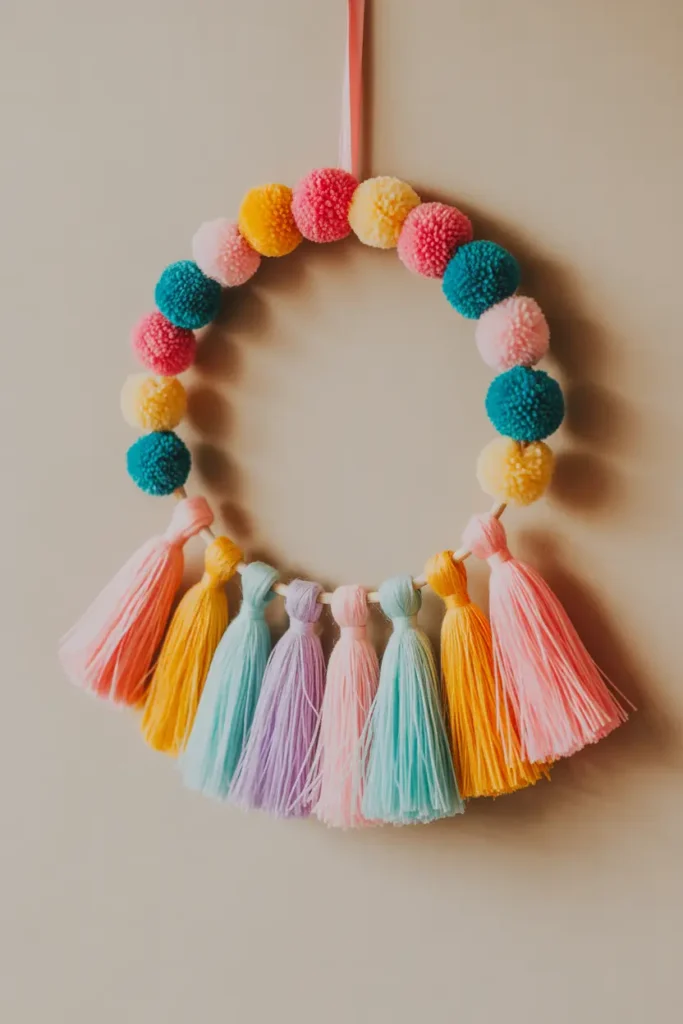
Materials Needed:
- Foam or wire wreath base
- Yarn in multiple colors
- Pom-pom maker or cardboard
- Hot glue gun
- Scissors
Steps:
- Make mini pom-poms using yarn.
- Create small tassels from matching yarn.
- Glue pom-poms and attach tassels around the base.
- Arrange for a balanced look.
- Hang the wreath.
A mini pom-pom and tassel wreath is a cheerful, playful project that adds color and texture to any space. Its vibrant, whimsical design is perfect for kids’ bedrooms, craft rooms, or celebratory décor. Beginners enjoy this DIY because making pom-poms and tassels is simple and forgiving, yet the final result looks lively and creative. The mix of textures brings movement and personality to a basic circular base, allowing crafters to experiment with colors and arrangements without worry.
This wreath can be personalized for birthdays, holidays, or themed parties by choosing coordinating colors. Its lightweight materials make it easy to hang anywhere, and it’s perfect as a fun, handmade gift. The combination of yarn textures and bright colors creates a joyful, eye-catching display that instantly livens up walls or doors. This DIY project is approachable, satisfying, and provides a unique alternative to traditional floral wreaths, offering a playful twist on seasonal and everyday décor.
14. Twigs & Fairy Light Wreath
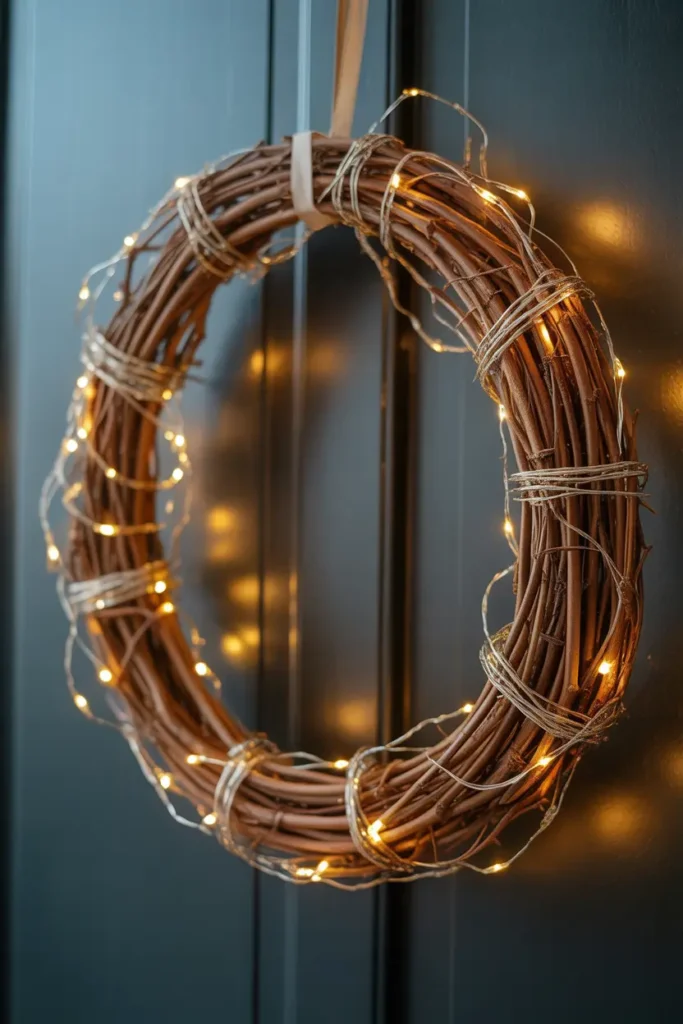
Materials Needed:
- Grapevine or twig wreath base
- Small twigs or branches
- Battery-operated fairy lights
- Twine
- Hot glue gun
Steps:
- Attach twigs around the base for fullness.
- Weave fairy lights evenly through twigs.
- Secure battery pack discreetly.
- Add twine bow if desired.
- Hang and illuminate.
A twigs and fairy light wreath is perfect for creating a magical, cozy atmosphere in your home. The combination of natural textures and soft glowing lights brings warmth and charm, ideal for living rooms, bedrooms, or seasonal décor. Beginners will find this DIY approachable because it requires minimal materials and allows flexible, artistic placement of twigs and lights. The wreath adds elegance without being overly complicated, providing a polished, professional look with a homemade touch.
You can enhance this wreath with small faux flowers, moss, or seasonal ornaments to match different occasions. The fairy lights are battery-operated, so it’s easy to display anywhere without worrying about cords. This wreath is an excellent gift for housewarmings, holidays, or cozy winter décor. Its enchanting glow and rustic feel combine nature and magic, offering a versatile, low-maintenance decorative option that works year-round and captures attention effortlessly.
15. Paper Origami Crane Wreath
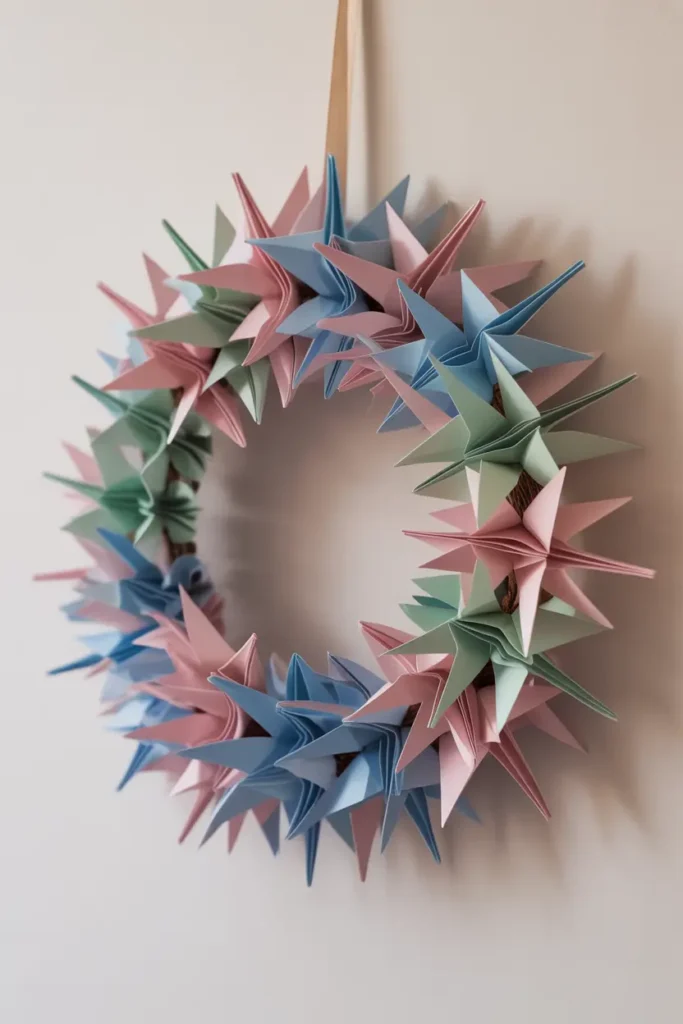
Materials Needed:
- Foam or wire wreath base
- Colored origami paper
- Glue or pins
- Ribbon for hanging
- Scissors
Steps:
- Fold paper cranes from colored origami sheets.
- Arrange cranes on the wreath base.
- Secure each crane with glue or pins.
- Fill gaps to create a 3D effect.
- Hang with ribbon.
A paper origami crane wreath is a creative, artistic project perfect for DIY enthusiasts who enjoy paper crafts. The delicate cranes create a layered, three-dimensional effect, offering elegance and sophistication. Beginners can practice origami while assembling a beautiful wreath, making it both fun and rewarding. The pastel colors add softness, making it suitable for living rooms, bedrooms, or craft areas. This unique wreath combines traditional art with modern décor, standing out as a handmade statement piece in any home.
This wreath can be customized with various paper patterns, sizes, or even metallic accents for added flair. It’s lightweight and easy to hang on walls, doors, or above mantels. The origami crane wreath also makes a thoughtful, handmade gift for art lovers, teachers, or friends who appreciate unique décor. Its intricate, delicate appearance contrasts beautifully with a simple base, creating a visually striking project that celebrates both creativity and craftsmanship.
16. Seashell Beach Wreath

Materials Needed:
- Rope-wrapped or foam wreath base
- Assorted seashells
- Small driftwood pieces
- Hot glue gun
- Ribbon for hanging
Steps:
- Arrange seashells and driftwood around the base.
- Glue each piece securely.
- Fill gaps with smaller shells for fullness.
- Attach a ribbon for hanging.
- Display on door or wall.
A seashell beach wreath brings the calming essence of the ocean into your home. Its natural textures and soft color palette create a relaxed, coastal aesthetic that’s perfect for summer décor or beach-themed rooms. Beginners can easily create this wreath because arranging shells and driftwood allows for a flexible, forgiving design. Whether displayed in bathrooms, living rooms, or entryways, it evokes a sense of serenity and a gentle connection to nature, making it both decorative and soothing.
You can personalize this wreath with sand dollars, tiny pebbles, or starfish accents for added charm. Its lightweight materials make it easy to hang on any wall or door. This handmade wreath also works beautifully as a gift for ocean lovers, beach house owners, or coastal décor enthusiasts. The combination of natural textures, colors, and shapes ensures every piece is unique, offering a tranquil, eye-catching decoration that instantly brings a touch of the seaside indoors.
17. Mini Chalkboard Seasonal Wreath
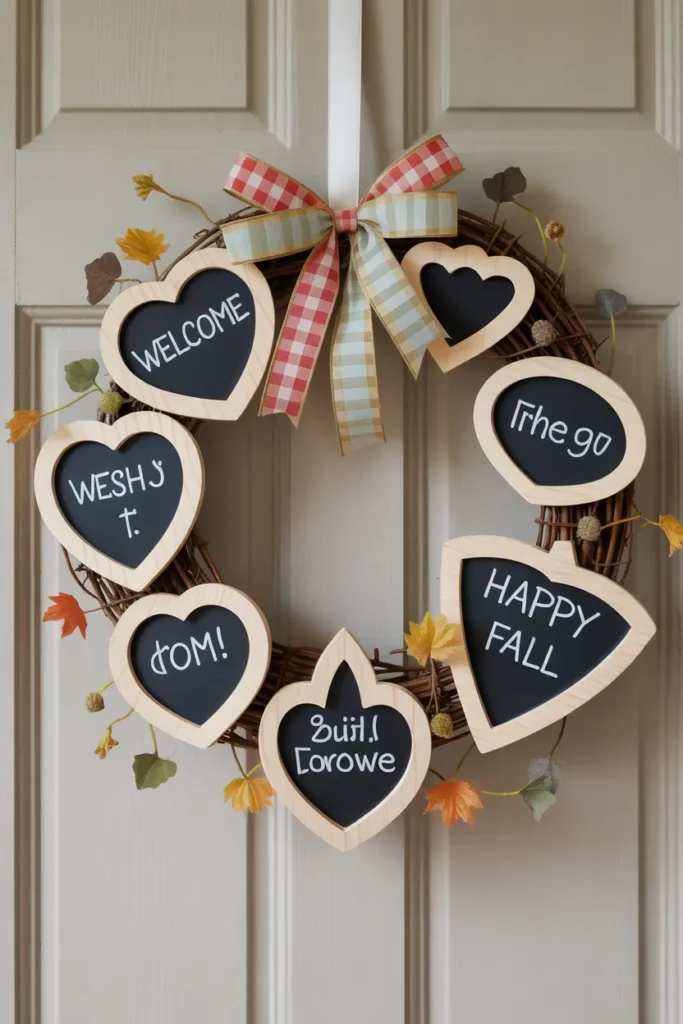
Materials Needed:
- Grapevine wreath base
- Mini chalkboards
- Chalk or chalk markers
- Ribbon or twine
- Hot glue gun
Steps:
- Attach mini chalkboards evenly around the wreath.
- Secure with glue or twine.
- Decorate with seasonal ribbons or small accents.
- Write seasonal messages with chalk.
- Hang and update as desired.
A mini chalkboard seasonal wreath offers endless customization and fun for seasonal décor. Its interactive element allows you to change messages for holidays, birthdays, or welcoming notes. Beginners enjoy this project because arranging the chalkboards and adding ribbon accents is simple, yet the final product looks polished and creative. This wreath works beautifully in kitchens, entryways, or classrooms, providing a playful yet functional decoration that can be refreshed throughout the year.
You can expand the design by adding small faux flowers, mini ornaments, or seasonal greenery. Its lightweight, versatile nature allows for easy updating, making it a long-lasting DIY. This wreath also makes a charming gift for teachers, friends, or family who love personalized décor. By combining practicality with creativity, it becomes a functional statement piece that brightens walls and doors while celebrating seasonal changes in a fun, handcrafted way.
18. Felt Flower Monogram Wreath

Materials Needed:
- Foam or wire wreath base
- Felt sheets
- Wooden monogram letter
- Hot glue gun
- Scissors
Steps:
- Cut felt into petal shapes and assemble flowers.
- Attach flowers around the wreath base.
- Glue the monogram letter in the center.
- Fill gaps with additional felt flowers or leaves.
- Hang the wreath.
A felt flower monogram wreath combines personalization with elegant craft design. The soft texture of felt flowers paired with a central monogram creates a charming, one-of-a-kind piece perfect for entryways, bedrooms, or nurseries. Beginners will enjoy assembling the flowers and experimenting with color combinations. The result is a visually striking wreath that feels thoughtful, handcrafted, and highly decorative. Its combination of color, texture, and personalization makes it ideal for showcasing style and celebrating individuality in your home décor.
This wreath is highly versatile: you can choose color schemes to match seasonal décor or personal taste. It also makes a meaningful, handmade gift for weddings, baby showers, or birthdays. The foam base provides stability while the felt flowers offer dimensional charm. The personalized monogram ensures that each wreath is unique and adds a warm, inviting touch to any space. Overall, this DIY project balances simplicity, elegance, and creativity, making it approachable for beginners while producing a high-impact decorative piece.
19. Metallic Wire Geometric Wreath
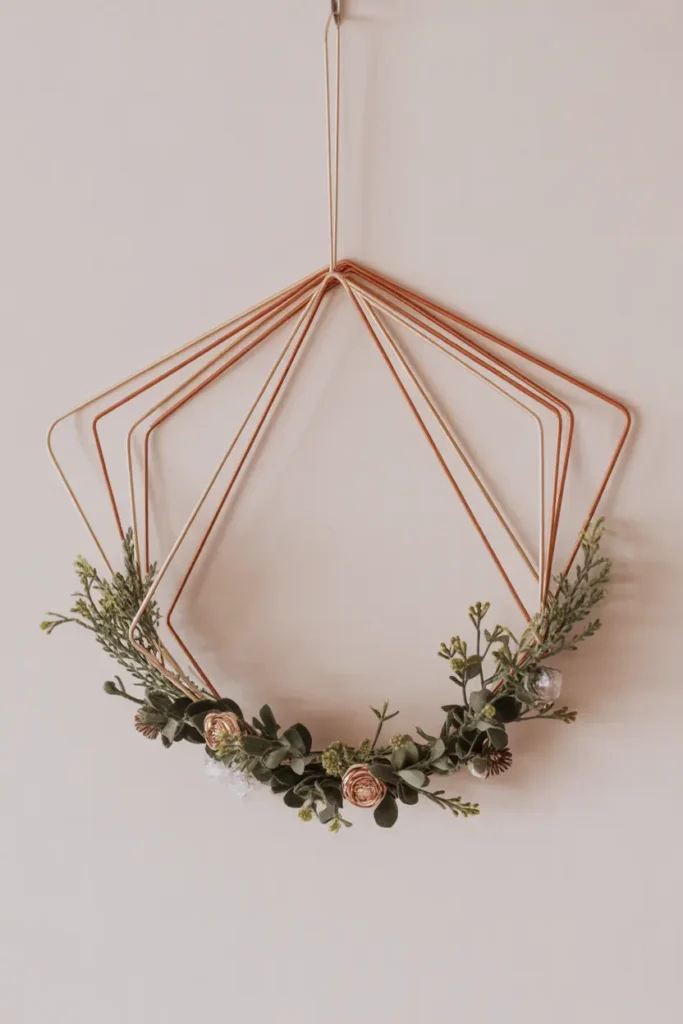
Materials Needed:
- Metallic wire
- Wire cutters
- Faux greenery or small flowers
- Hot glue gun or floral wire
- Circular base (optional)
Steps:
- Shape metallic wire into geometric forms.
- Attach shapes to wreath base or form a standalone wreath.
- Add faux greenery or flowers for accent.
- Secure elements with wire or glue.
- Hang on wall or door.
A metallic wire geometric wreath offers a sleek, modern twist on traditional wreaths. Its minimalist design works well in contemporary, industrial, or Scandinavian interiors. Beginners can experiment with wire shapes without needing precision, and adding small greenery enhances visual appeal. This DIY allows for endless creativity with shapes, size, and metallic tones, resulting in a chic, personalized décor piece. It’s perfect for doors, walls, or as part of a gallery display, bringing a clean, stylish aesthetic that contrasts beautifully with natural textures.
You can customize this wreath with colored metallic wires, additional geometric layers, or small hanging ornaments. Its lightweight nature allows for easy placement on any wall or door. This modern DIY also makes a unique, handmade gift for friends or family who love contemporary décor. Combining metallic shine with minimalistic greenery, the wreath achieves a balance of elegance and simplicity, offering a decorative statement piece that’s both versatile and eye-catching. It’s a perfect project for crafters seeking a modern, creative challenge.
20. Rustic Burlap & Sunflower Wreath
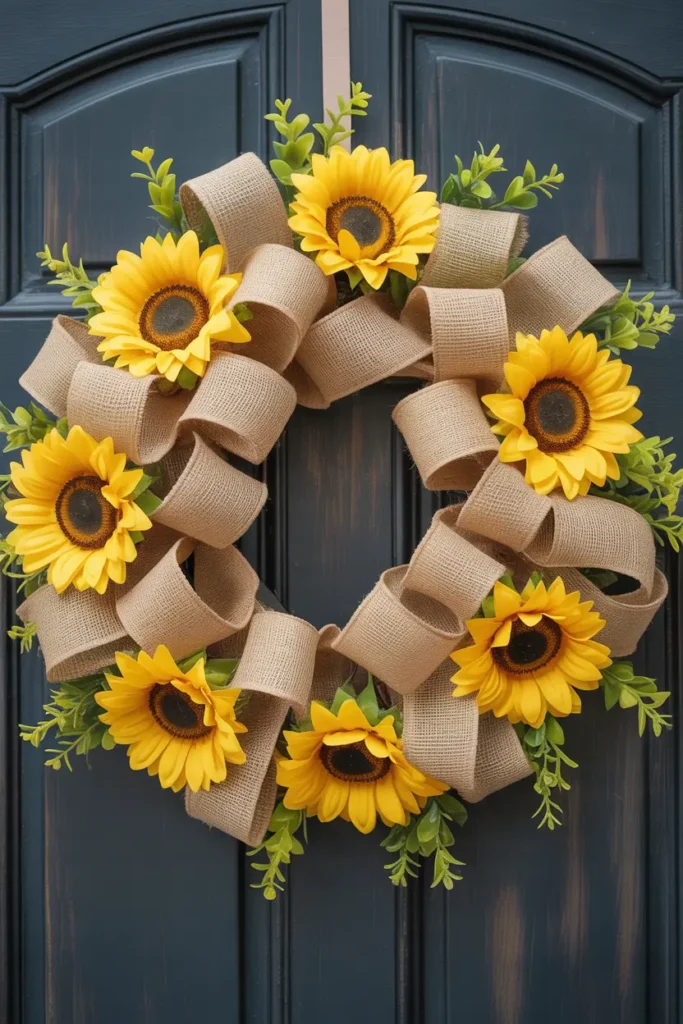
Materials Needed:
- Wire or foam wreath base
- Burlap ribbon
- Faux sunflowers
- Faux greenery
- Hot glue gun
Steps:
- Loop and attach burlap ribbon around the base.
- Glue sunflowers evenly around wreath.
- Fill gaps with greenery.
- Adjust for balance and fullness.
- Hang and display.
A rustic burlap and sunflower wreath brings warmth, cheer, and farmhouse charm to your home. Its earthy textures combined with bright blooms create a welcoming, sunny atmosphere. Beginners enjoy this project because arranging ribbon loops and flowers is simple yet visually impactful. Perfect for entryways, living rooms, or seasonal décor, this wreath adds a handcrafted touch with minimal effort. The combination of neutral burlap with vibrant sunflowers balances rustic charm with color, making it versatile for multiple settings and décor styles.
You can customize it with seasonal ribbons, small faux berries, or autumn leaves to suit different occasions. Its lightweight materials make hanging easy anywhere in the home. The rustic and cheerful aesthetic also makes it an excellent handmade gift. This wreath celebrates simplicity, charm, and creativity, offering a decorative solution that feels welcoming and thoughtful. Combining natural textures, bright florals, and accessible materials, it’s a beginner-friendly project that results in a beautiful, attention-grabbing piece suitable for year-round or seasonal display.
21. Book Page & Paper Flower Wreath
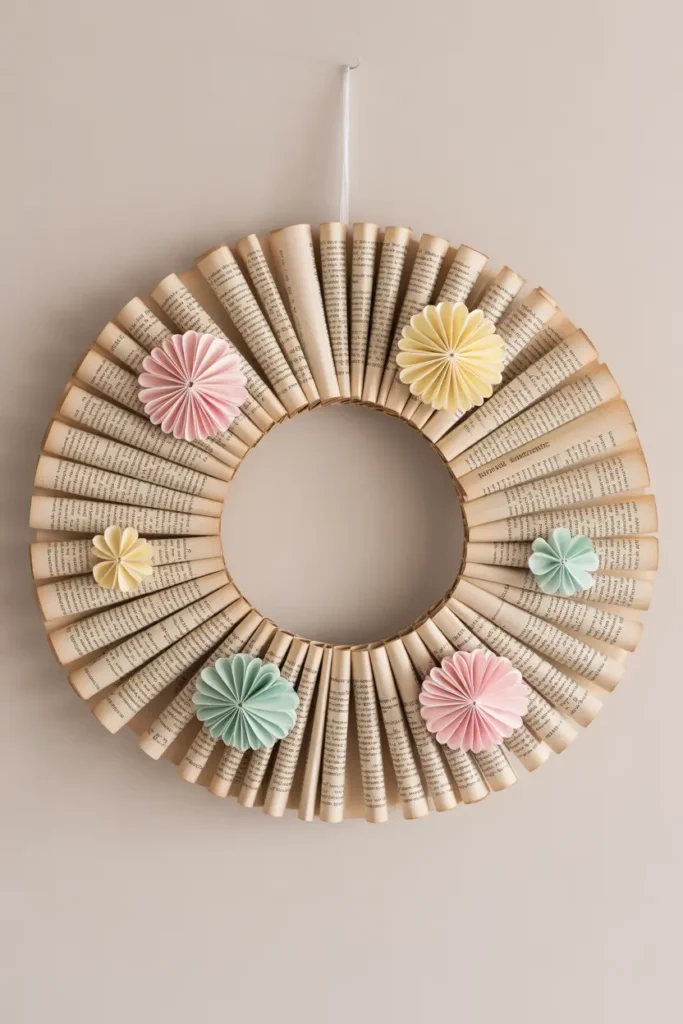
Materials Needed:
- Foam or wire wreath base
- Old book pages
- Colored paper for flowers
- Hot glue gun
- Scissors
Steps:
- Roll and fold book pages into cones or scrolls.
- Attach the paper rolls evenly around the wreath base.
- Create paper flowers from colored sheets.
- Glue flowers on top of book pages for accent.
- Hang and enjoy your literary-inspired decoration.
A book page and paper flower wreath combines creativity, texture, and literary charm. Using old book pages adds a nostalgic, vintage feel while paper flowers bring freshness and color. Beginners will enjoy assembling the rolled pages and flowers because the technique is forgiving yet visually stunning. This wreath is perfect for libraries, reading nooks, or as a gift for book lovers. Its layered texture and colorful floral accents make it eye-catching and unique, celebrating both craftsmanship and a love for literature.
This wreath is versatile and can be personalized with different flower colors, page sizes, or added embellishments like tiny beads or ribbon. Its handmade charm makes it ideal for gifting, book club décor, or personal creative spaces. The combination of vintage book textures and soft paper florals ensures each wreath is one of a kind. Lightweight yet visually impactful, this DIY project allows for artistic expression while creating a meaningful, decorative piece that blends literature, craft, and whimsy into a single beautiful display.
Conclusion
Creating your own wreaths is a fun, creative, and rewarding way to decorate for every season. These 21 ideas provide endless inspiration for personalizing your space with colors, textures, and materials that suit your style. Whether you’re making gifts, sprucing up your home, or experimenting with new craft techniques, these DIY wreaths combine simplicity and charm. With minimal supplies and maximum creativity, you can make stunning, handmade decorations that bring warmth, beauty, and personality to any room.